
Introduction: Blending Art and Technology
Picture this: a canvas where your wildest artistic visions spring to life with a few clicks. Fortunately, that’s no longer a dream—it’s reality, thanks to Generative Adversarial Networks (GANs). As someone with over 11 years in data science, machine learning, and software development, I’ve watched tech reshape industries. Yet, nothing stirs my passion like using GANs for interactive art. This blog takes you on an end-to-end journey to create your own masterpieces. Whether you’re a coder, artist, or just curious, there’s something here for you. So, let’s embark on this exciting adventure together!
Moreover, we’ll explore why GANs are a game-changer. From setup to showcase, I’ll share tips, code, and inspiration. Ready to dive in? Let’s get started!
What Are GANs? A Beginner-Friendly Guide
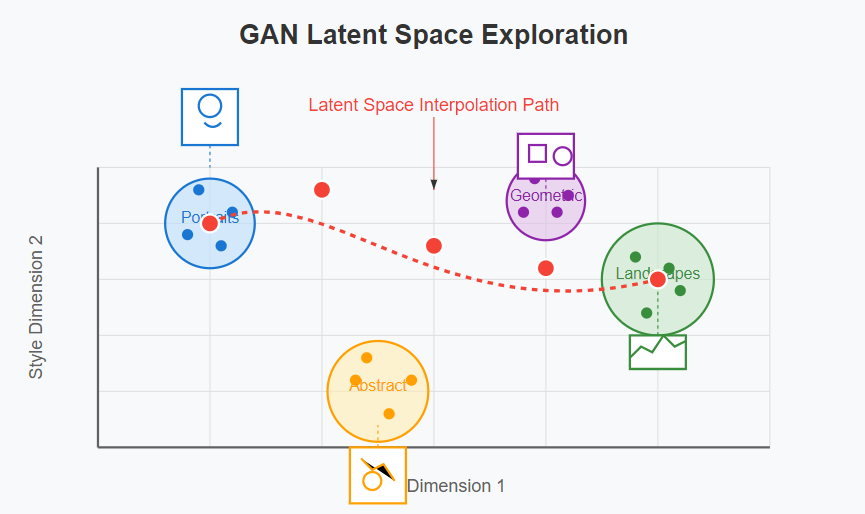
First, let’s demystify GANs. Generative Adversarial Networks are AI models pioneered by Ian Goodfellow in 2014. Essentially, they pit two neural networks against each other: a Generator and a Discriminator. The Generator crafts fake images from random noise, while the Discriminator decides if they’re real or not. Over time, this rivalry sharpens their skills, producing jaw-dropping results. For example, GANs can whip up portraits, landscapes, or quirky abstract designs.
Now, imagine tweaking this process to make art interactive. Pretty thrilling, right? Additionally, GANs learn from vast datasets—like paintings or photos—making them ideal for creative projects. In this guide, we’ll harness that power for art you can play with. So, let’s move ahead and see why this matters!
Why GANs Shine for Interactive Art
So, why pick GANs over tools like Photoshop or Illustrator? For starters, GANs don’t just edit—they invent. Unlike traditional software, they generate fresh content from scratch. Plus, they enable real-time interaction. Users can tweak colors, shapes, or styles instantly, which feels like pure magic. Meanwhile, manual tools demand effort for every tweak.
Furthermore, GANs bring a playful vibe. Train them on your doodles or famous artworks, and watch them evolve into something new. Consequently, they democratize art—anyone can create, no mastery required. Also, the surprise factor keeps you hooked. Ever wondered what your sketch might look like as a Monet? GANs can show you. Excited yet? Let’s explore the setup next!
Setting Up Your GAN Art Studio
Before we create, we need a workspace. Thankfully, setting up is simpler than it sounds. As someone who’s built countless AI projects, I’ll walk you through it step by step. Here’s what you’ll need:
1. Hardware Essentials
First, grab a decent GPU—like an NVIDIA GTX 1060 or better. Why? GANs are hungry for processing power, and a GPU speeds things up. No GPU? No worries—cloud options like Google Colab work too. Next, ensure you have enough RAM (8GB minimum) to handle datasets.
2. Software Toolkit
Now, install Python—it’s the backbone of AI work. Then, add key libraries. For instance, TensorFlow is a solid choice:
pip install tensorflowAlternatively, PyTorch offers flexibility:
pip install torch torchvisionAlso, grab NumPy for data handling:
pip install numpy3. Picking a Dataset
Finally, choose your training data. Public sets like WikiArt offer thousands of paintings. Or, scan your own sketches for a personal touch. Either way, resize images to 64×64 pixels for starters. Ready? Let’s build our GAN next!
Building Your First GAN: A Hands-On Approach
Now, it’s time to get coding. Don’t panic—I’ll keep it simple and fun. Creating a GAN involves a few clear steps. Let’s break them down.
Step 1: Preparing Your Dataset
First, gather your images. For example, download WikiArt’s collection or sketch your own. Then, preprocess them. Resize to 64×64 pixels and normalize pixel values between -1 and 1. This ensures smooth training. Tools like OpenCV or PIL can help:
from PIL import Image
import numpy as np

img = Image.open("art.jpg").resize((64, 64))
img_array = np.array(img) / 127.5 - 1.0
Step 2: Crafting the Generator
Next, build the Generator. It takes random noise and spits out art. Here’s a basic PyTorch example:
import torch.nn as nn

class Generator(nn.Module):
    def __init__(self):
        super(Generator, self).__init__()
        self.main = nn.Sequential(
            nn.Linear(100, 256),
            nn.ReLU(),
            nn.Linear(256, 512),
            nn.ReLU(),
            nn.Linear(512, 64 * 64 * 3),
            nn.Tanh()
        )

    def forward(self, x):
        return self.main(x).view(-1, 3, 64, 64)
This turns noise into a 64×64 RGB image. Cool, right?
Step 3: Designing the Discriminator
Then, create the Discriminator. It judges if images are real or fake. Here’s a sample:
class Discriminator(nn.Module):
    def __init__(self):
        super(Discriminator, self).__init__()
        self.main = nn.Sequential(
            nn.Linear(64 * 64 * 3, 512),
            nn.LeakyReLU(0.2),
            nn.Linear(512, 256),
            nn.LeakyReLU(0.2),
            nn.Linear(256, 1),
            nn.Sigmoid()
        )

    def forward(self, x):
        return self.main(x.view(-1, 64 * 64 * 3))
Together, these networks spar until the art shines.
Step 4: Training Loop Basics
Finally, set up training. Feed real images to the Discriminator and fake ones from the Generator. Adjust both using loss functions like binary cross-entropy. Don’t worry—we’ll dive deeper into training later. For now, you’ve got the foundation!
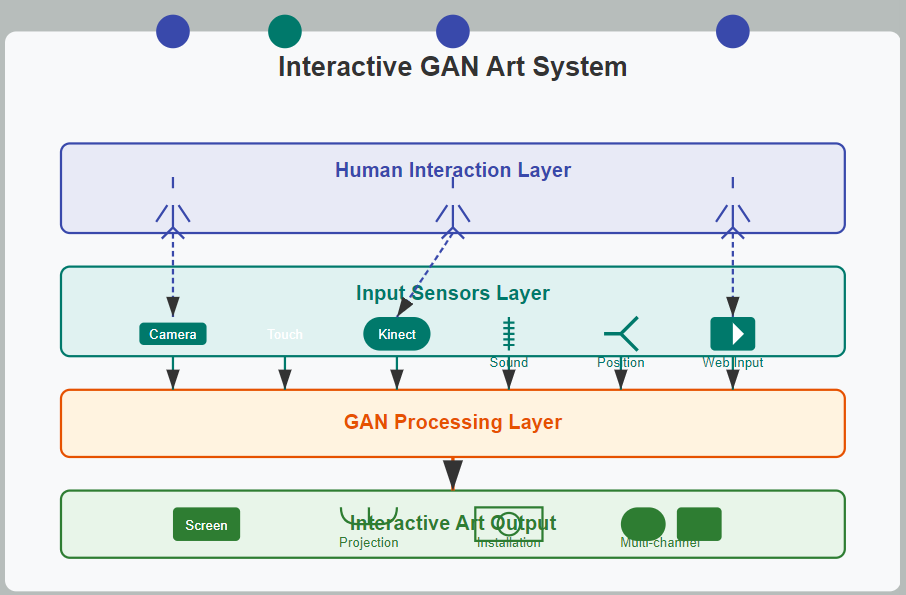
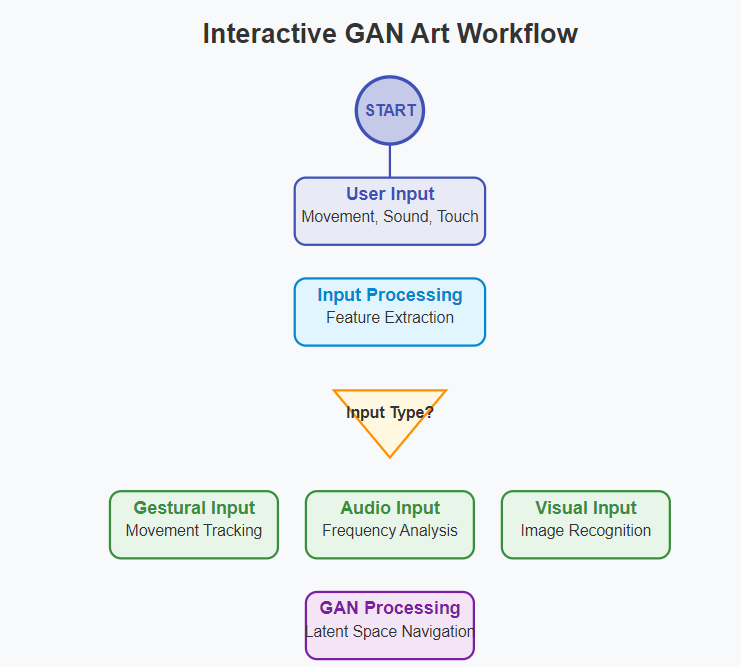
Making Art Interactive: The Fun Part
Here’s where things get thrilling. To make your GAN interactive, add user controls. For instance, let people adjust sliders for brightness or style. Alternatively, use mouse clicks to shape the output.
Step 1: Building a Simple UI
First, pick a framework. Flask is great for web-based interaction:
from flask import Flask, render_template
app = Flask(__name__)

@app.route('/')
def home():
    return render_template('index.html')
Then, craft an HTML file with sliders:
<input type="range" min="0" max="1" step="0.1" id="color"> Step 2: Connecting to the GAN
Next, link the slider to the Generator’s input. For example, tweak the noise vector based on slider values. Consequently, the art updates live. This real-time feedback sparks joy and creativity. Imagine users giggling as their tweaks transform the canvas!
Step 3: Adding More Features
Also, consider buttons to save outputs or switch styles. This keeps users engaged. Later, we’ll explore advanced interactivity options. For now, you’ve got a playful start!
Training Your GAN: A Deep Dive
Training is the heart of the process. However, it can feel daunting. Don’t fret—I’ve got you covered with detailed tips.
1. Balancing the Duel
First, ensure the Generator and Discriminator stay even. If the Discriminator dominates, the Generator stalls. So, use learning rates like 0.0002 for both. Also, update the Discriminator less often—say, once per five Generator updates.
2. Batch Size Matters
Next, stick to small batches—64 works well. This prevents memory overload and stabilizes training. For bigger datasets, scale up gradually.
3. Patience Pays Off
Moreover, training takes time. On a decent GPU, expect hours—or days for complex art. For instance, after 50 epochs, patterns emerge. After 200, you’ll see polished results.
4. Monitoring Progress
Finally, visualize outputs during training. Save samples every few epochs to track improvement. Seeing progress keeps you motivated. Soon, your GAN will churn out stunning art!
Showcasing Your Creation
Once trained, it’s showtime. Share your interactive art with the world. For example, host it on a Flask site or post it on platforms like Twitter. Additionally, let users play with it—sliders, buttons, and all.
1. Hosting Online
First, deploy with Flask or Heroku. A simple site lets users tweak settings and download results. Consequently, engagement soars.
2. Community Feedback
Next, invite feedback. Post on art forums or Reddit’s r/MachineLearning. People love interactive tech—watch the buzz grow!
3. Saving Favorites
Also, add a “save” button. Users can keep their best creations, boosting satisfaction. Before long, your project could inspire others!
Real-World GAN Art Inspirations
GANs aren’t just theory—they’re thriving out there. For instance, Artbreeder blends images into surreal hybrids. Users tweak sliders to morph faces or landscapes. Similarly, DeepArt transforms photos into Picasso-esque pieces.
Moreover, artists like Refik Anadol use GANs for mind-blowing installations. His exhibits morph data into flowing visuals, captivating audiences worldwide. Meanwhile, RunwayML offers tools for creators to experiment with GANs. These examples prove the potential. So, what will you dream up?
Overcoming Common GAN Challenges
Of course, GANs have quirks. Fortunately, solutions exist. Let’s tackle a few hurdles.
1. Mode Collapse
Sometimes, the Generator repeats the same output. To fix this, diversify your dataset or tweak the loss function. For example, add Wasserstein loss for variety.
2. Hardware Limits
Also, training might crash on weak machines. Instead, use Google Colab’s free GPUs. Problem solved!
3. Blurry Outputs
If art looks fuzzy, train longer or increase image resolution gradually. Consequently, clarity improves. With patience, you’ll conquer these bumps!
Advanced Tricks for GAN Art
Ready to level up? Here are pro techniques I’ve learned over the years.
1. Style Transfer
First, blend styles. Train your GAN on Van Gogh, then tweak it with modern inputs. The results? Mesmerizing hybrids.
2. Conditional GANs
Next, try Conditional GANs. Add labels—like “sunset” or “forest”—to guide outputs. This gives users more control.
3. Animation
Also, generate frame-by-frame art for animations. Link noise inputs across time, and watch your art dance. These tricks take your project from cool to unforgettable!
Conclusion: Your Creative Journey Starts Now
In summary, GANs unlock a world of joyful, interactive art. From coding to showcasing, you’ve got a full roadmap. So, fire up your laptop, unleash your imagination, and start tinkering.
Furthermore, share your work—someone’s waiting to be amazed. What’s your first idea? Drop it in the comments! Happy creating!
Resources
For further exploration of interactive GAN art, consider these valuable resources:
- Goodfellow, I., et al. (2014). “Generative Adversarial Networks.” arXiv preprint arXiv:1406.2661. https://arxiv.org/abs/1406.2661
- Karras, T., et al. (2020). “Analyzing and Improving the Image Quality of StyleGAN.” IEEE/CVF Conference on Computer Vision and Pattern Recognition. https://arxiv.org/abs/1912.04958
- Zhu, J.Y., et al. (2017). “Unpaired Image-to-Image Translation using Cycle-Consistent Adversarial Networks.” IEEE International Conference on Computer Vision. https://arxiv.org/abs/1703.10593
- Processing Foundation – Resources for creative coding with a focus on visual arts. https://processing.org
- RunwayML – Platform for creative applications of machine learning. https://runwayml.com
- Obvious Collective – Art collective exploring the creative potential of AI. https://obvious-art.com
Also Read
- Ultimate Guide to Activation Functions for Neural Networks
- Stable Diffusion: Create Stunning AI Art Easily!
drover sointeru
says:
Deference to post author, some great selective information.