
Introduction: The Transformative Power of Named Entity Recognition
Have you ever wondered how chatbots instantly identify people, locations, and organizations in your text? Furthermore, the magic behind this intelligence is Named Entity Recognition (NER), a cornerstone technology in modern natural language processing. As a seasoned data scientist with over a decade of experience building NLP systems, I’m excited to guide you through the fascinating journey of creating your own high-performance NER model.
In today’s data-driven world, the ability to automatically extract and classify named entities from unstructured text is not just impressive—it’s essential for businesses seeking to unlock valuable insights. Therefore, whether you’re analyzing customer feedback, processing legal documents, or building the next generation of conversational AI, mastering NER will undoubtedly elevate your data science capabilities to new heights.
Throughout this comprehensive guide, we’ll explore everything from foundational concepts to advanced implementation techniques. Additionally, I’ll share practical code examples and optimization strategies drawn from my years of developing production-ready NLP systems. By the end, you’ll have the knowledge and tools to develop a high-accuracy NER model tailored to your specific needs.
Let’s begin this enlightening journey into the world of named entity recognition!
Understanding Named Entity Recognition: The Foundation of Intelligence
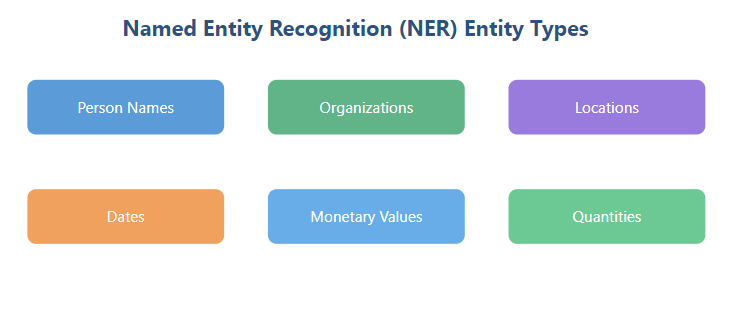
Before diving into implementation, we must first understand what named entity recognition actually is. In essence, NER is a subtask of information extraction that seeks to locate and classify named entities in text into predefined categories. Usually, these categories include:
- Persons (e.g., “Barack Obama,” “Marie Curie”)
- Organizations (e.g., “Google,” “United Nations”)
- Locations (e.g., “Paris,” “Mount Everest”)
- Date and time expressions
- Quantities and monetary values
- Products
The power of NER, however, extends far beyond these standard categories. Interestingly, domain-specific applications might require recognizing entities like medical conditions, drugs, gene names, or technical specifications. Consequently, the versatility of NER makes it an indispensable tool across numerous industries.
Real-World Applications That Showcase NER’s Value
To truly appreciate the impact of NER, consider these transformative applications:
- Content Recommendation Systems: NER helps identify topics and entities in articles to match user interests.
- Customer Support Automation: By extracting product names and issues from support tickets, businesses can route inquiries more efficiently.
- Competitive Intelligence: Companies use NER to extract competitor names, products, and activities from news articles.
- Healthcare Information Management: Medical professionals leverage NER to identify diseases, treatments, and medications in clinical notes.
- Legal Document Analysis: Law firms utilize NER to extract case references, parties involved, and legal concepts.
Meanwhile, the business value generated by these applications is significant. According to recent research, organizations implementing NER-powered solutions report up to 40% improvements in process efficiency and data utilization.
Building Your First NER Model: A Step-by-Step Approach
Now that we understand the importance of NER, let’s roll up our sleeves and build our first model. Initially, we’ll focus on a straightforward approach using spaCy, one of the most popular NLP libraries, before advancing to more sophisticated techniques.
Setting Up Your Environment
First things first, you’ll need to set up your development environment:
# Install required packages
!pip install spacy
!python -m spacy download en_core_web_sm
!pip install pandas matplotlib seaborn scikit-learn

# Import necessary libraries
import spacy
import pandas as pd
import numpy as np
import matplotlib.pyplot as plt
import seaborn as sns
from spacy.tokens import DocBin
from tqdm import tqdm
Preparing Your Dataset
The foundation of any good NER model is high-quality training data. Therefore, let’s explore how to prepare and structure your dataset:
# Example of a training data structure for spaCy
train_data = [
    ("Apple is looking at buying U.K. startup for $1 billion", {
        "entities": [(0, 5, "ORG"), (23, 27, "GPE"), (28, 35, "ORG"), (40, 50, "MONEY")]
    }),
    ("Microsoft announced Windows 11 release for October 2021", {
        "entities": [(0, 9, "ORG"), (20, 30, "PRODUCT"), (42, 55, "DATE")]
    })
]

# Convert to spaCy's format
nlp = spacy.blank("en")
db = DocBin()

for text, annotations in train_data:
    doc = nlp.make_doc(text)
    ents = []
    for start, end, label in annotations["entities"]:
        span = doc.char_span(start, end, label=label)
        if span is not None:
            ents.append(span)
    doc.ents = ents
    db.add(doc)

db.to_disk("./train.spacy")
Training a Basic NER Model with spaCy
With our data prepared, we can now train a simple yet effective NER model:
# Create a configuration file for training
config = """
[paths]
train = "./train.spacy"
dev = "./train.spacy"
vectors = null
[system]
gpu_allocator = null
seed = 0

[nlp]
lang = "en"
pipeline = ["tok2vec", "ner"]
batch_size = 1000

[components]

[components.tok2vec]
factory = "tok2vec"

[components.tok2vec.model]
@architectures = "spacy.Tok2Vec.v2"

[components.tok2vec.model.embed]
@architectures = "spacy.MultiHashEmbed.v2"
width = 96
attrs = ["NORM", "PREFIX", "SUFFIX", "SHAPE"]
rows = [5000, 2500, 2500, 2500]
include_static_vectors = false

[components.tok2vec.model.encode]
@architectures = "spacy.MaxoutWindowEncoder.v2"
width = 96
depth = 4
window_size = 1
maxout_pieces = 3

[components.ner]
factory = "ner"

[components.ner.model]
@architectures = "spacy.TransitionBasedParser.v2"
state_type = "ner"
extra_state_tokens = false
hidden_width = 64
maxout_pieces = 2
use_upper = true
nO = null

[components.ner.model.tok2vec]
@architectures = "spacy.Tok2VecListener.v1"
width = 96
upstream = "tok2vec"

[training]
dev_corpus = "corpora.dev"
train_corpus = "corpora.train"
seed = 1
gpu_allocator = null
dropout = 0.1
accumulate_gradient = 1
patience = 1600
max_epochs = 0
max_steps = 20000
eval_frequency = 200
frozen_components = []
annotating_components = []
before_to_disk = null

[training.batcher]
@batchers = "spacy.batch_by_words.v1"
discard_oversize = false
tolerance = 0.2
get_length = null

[training.batcher.size]
@schedules = "compounding.v1"
start = 100
stop = 1000
compound = 1.001
t = 0.0

[training.optimizer]
@optimizers = "Adam.v1"
beta1 = 0.9
beta2 = 0.999
L2_is_weight_decay = true
L2 = 0.01
grad_clip = 1.0
use_averages = false
eps = 0.00000001

[training.optimizer.learn_rate]
@schedules = "warmup_linear.v1"
warmup_steps = 250
total_steps = 20000
initial_rate = 0.00005

[training.score_weights]
ents_f = 1.0
ents_p = 0.0
ents_r = 0.0
ents_per_type = null

[pretraining]

[initialize]
vectors = null
init_tok2vec = null
vocab_data = null
lookups = null
before_init = null
after_init = null

[initialize.components]

[initialize.tokenizer]
"""

with open("config.cfg", "w") as f:
    f.write(config)

# Train the model
!python -m spacy train config.cfg --output ./model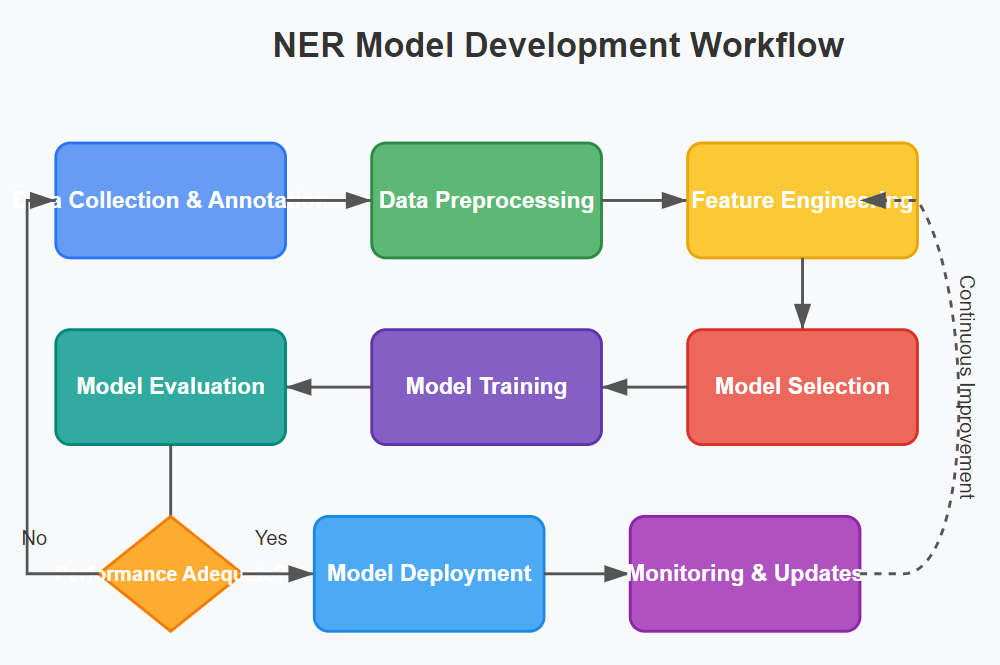
Advanced NER: Leveraging Transformer Models for Superior Accuracy
While spaCy provides an excellent starting point, achieving state-of-the-art performance often requires leveraging transformer-based models. Subsequently, let’s explore how to implement a more advanced NER solution using Hugging Face’s transformers library:
# Install transformers
!pip install transformers datasets evaluate seqeval

# Import libraries
import torch
from datasets import load_dataset
from transformers import AutoTokenizer, AutoModelForTokenClassification
from transformers import TrainingArguments, Trainer
from transformers import DataCollatorForTokenClassification
import evaluate
import numpy as np

# Load a pre-trained model and tokenizer
model_checkpoint = "distilbert-base-uncased"
tokenizer = AutoTokenizer.from_pretrained(model_checkpoint)

# Prepare your dataset (example using CoNLL-2003)
datasets = load_dataset("conll2003")

# Define label list
label_list = datasets["train"].features["ner_tags"].feature.names

# Tokenization function
def tokenize_and_align_labels(examples):
    tokenized_inputs = tokenizer(
        examples["tokens"], truncation=True, is_split_into_words=True
    )
    labels = []
    for i, label in enumerate(examples["ner_tags"]):
        word_ids = tokenized_inputs.word_ids(batch_index=i)
        previous_word_idx = None
        label_ids = []
        for word_idx in word_ids:
            if word_idx is None:
                label_ids.append(-100)
            elif word_idx != previous_word_idx:
                label_ids.append(label[word_idx])
            else:
                label_ids.append(-100)
            previous_word_idx = word_idx
        labels.append(label_ids)
    tokenized_inputs["labels"] = labels
    return tokenized_inputs

# Apply tokenization
tokenized_datasets = datasets.map(
    tokenize_and_align_labels, batched=True, remove_columns=datasets["train"].column_names
)

# Data collator
data_collator = DataCollatorForTokenClassification(tokenizer=tokenizer)

# Evaluation metrics
seqeval = evaluate.load("seqeval")

def compute_metrics(eval_preds):
    predictions, labels = eval_preds
    predictions = np.argmax(predictions, axis=2)

    true_predictions = [
        [label_list[p] for (p, l) in zip(prediction, label) if l != -100]
        for prediction, label in zip(predictions, labels)
    ]
    true_labels = [
        [label_list[l] for (p, l) in zip(prediction, label) if l != -100]
        for prediction, label in zip(predictions, labels)
    ]

    results = seqeval.compute(predictions=true_predictions, references=true_labels)
    return {
        "precision": results["overall_precision"],
        "recall": results["overall_recall"],
        "f1": results["overall_f1"],
        "accuracy": results["overall_accuracy"],
    }

# Initialize model
model = AutoModelForTokenClassification.from_pretrained(
    model_checkpoint, num_labels=len(label_list)
)

# Training arguments
training_args = TrainingArguments(
    output_dir="./results",
    evaluation_strategy="epoch",
    learning_rate=2e-5,
    per_device_train_batch_size=16,
    per_device_eval_batch_size=16,
    num_train_epochs=3,
    weight_decay=0.01,
)

# Initialize Trainer
trainer = Trainer(
    model=model,
    args=training_args,
    train_dataset=tokenized_datasets["train"],
    eval_dataset=tokenized_datasets["validation"],
    tokenizer=tokenizer,
    data_collator=data_collator,
    compute_metrics=compute_metrics,
)

# Train the model
trainer.train()
Optimizing Your NER Model: The Path to Excellence
Once you have a working model, the journey to excellence is just beginning. Moreover, the difference between mediocre and outstanding NER performance often lies in thoughtful optimization. Let’s explore the key strategies to elevate your model:
Fine-Tuning for Domain-Specific Applications
General-purpose NER models rarely excel in specialized domains. For instance, a model trained on news articles might perform poorly on medical texts. Therefore, domain adaptation is crucial:
- Collect domain-specific annotated data: Even a few hundred carefully annotated examples can significantly improve performance.
- Apply transfer learning: Start with a pre-trained model and fine-tune it on your domain data.
- Consider custom entity types: Standard entity categories might not capture the concepts unique to your domain.
Implementing Active Learning to Maximize Annotation Efficiency
Data annotation is expensive and time-consuming. Fortunately, active learning can help prioritize which samples to annotate:
# Pseudo-code for an active learning workflow
def active_learning_cycle(unlabeled_data, model, n_samples=100):
    # Predict on unlabeled data
    predictions = model.predict(unlabeled_data)

    # Calculate uncertainty scores (entropy-based)
    uncertainties = calculate_entropy(predictions)

    # Select the most uncertain samples
    idx_to_annotate = np.argsort(uncertainties)[-n_samples:]
    samples_to_annotate = unlabeled_data[idx_to_annotate]

    # These samples would now go to human annotators
    # After annotation, they're added to the training set
    # and the model is retrained

    return samples_to_annotate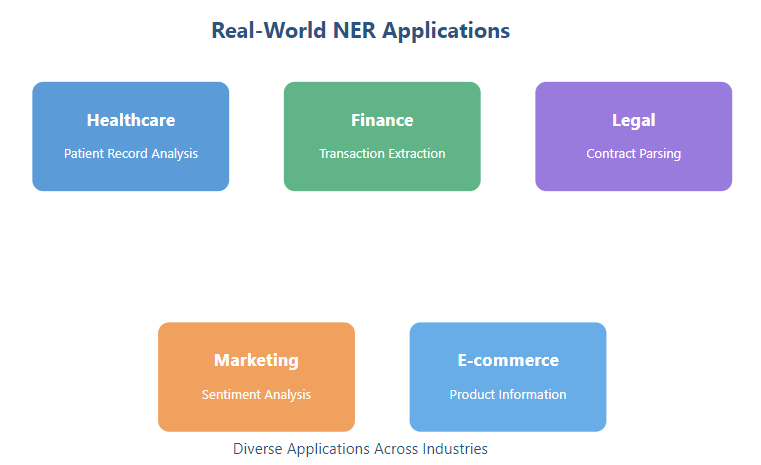
Advanced Feature Engineering: Context Matters
Despite the power of transformer models, carefully designed features can still boost performance:
- Word embeddings: Experiment with domain-specific embeddings (e.g., BioWordVec for biomedical texts).
- Gazetteer features: Incorporate lists of known entities as features.
- Morphological features: Character n-grams can help with rare or misspelled entities.
- Contextual features: Consider a window of surrounding words or sentences.
Evaluating and Deploying Your NER Model
After training and optimizing your model, proper evaluation and deployment are critical steps for real-world success.
Beyond Precision and Recall: Comprehensive Evaluation
While F1 scores are standard, a more nuanced evaluation provides deeper insights:
from seqeval.metrics import classification_report

# Get predictions
y_true = [['O', 'B-MISC', 'I-MISC', 'O', 'B-PER', 'I-PER']]
y_pred = [['O', 'B-MISC', 'I-MISC', 'O', 'B-PER', 'O']]

# Generate detailed report
print(classification_report(y_true, y_pred))

# Analyze errors by category
def analyze_errors(y_true, y_pred, texts):
    errors = []
    for true_seq, pred_seq, text in zip(y_true, y_pred, texts):
        for i, (true, pred) in enumerate(zip(true_seq, pred_seq)):
            if true != pred:
                errors.append({
                    'text': text[i],
                    'context': ' '.join(text[max(0, i-2):min(len(text), i+3)]),
                    'true_label': true,
                    'pred_label': pred
                })
    return pd.DataFrame(errors)

errors_df = analyze_errors(y_true, y_pred, texts)
print(errors_df.groupby(['true_label', 'pred_label']).size())
Deploying Your NER Model in Production
Finally, deploying your model requires balancing performance, efficiency, and reliability:
- Model optimization: Consider quantization or distillation to reduce model size and improve inference speed.
- Containerization: Package your model with Docker for consistent deployment.
- API design: Create a well-documented REST API for easy integration.
- Monitoring: Implement logging and alerting to track model performance in production.
# Example of a simple Flask API for NER
from flask import Flask, request, jsonify
import spacy

app = Flask(__name__)
nlp = spacy.load("./model")  # Load your trained model

@app.route('/predict', methods=['POST'])
def predict():
    data = request.json
    text = data.get('text', '')

    doc = nlp(text)
    entities = [{'text': ent.text, 'label': ent.label_, 'start': ent.start_char, 'end': ent.end_char}
                for ent in doc.ents]

    return jsonify({'entities': entities})

if __name__ == '__main__':
    app.run(debug=True, host='0.0.0.0', port=5000)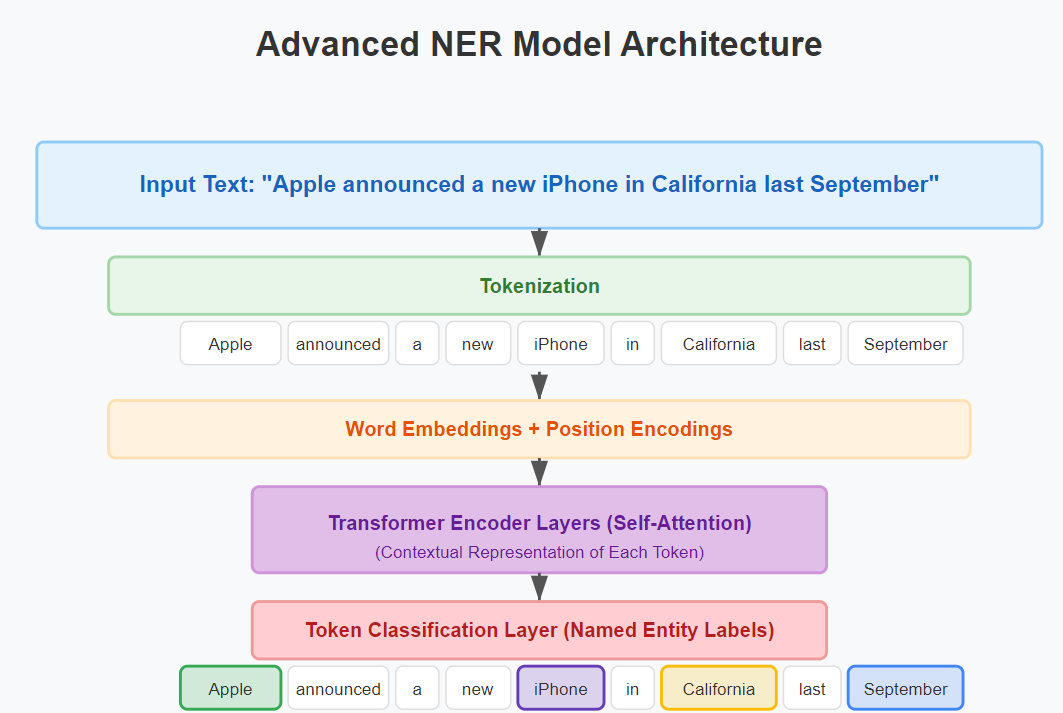
The Future of NER: Emerging Trends and Techniques
As we look ahead, several exciting developments are shaping the future of named entity recognition:
Zero-Shot and Few-Shot Learning
The latest research is moving toward models that can recognize new entity types with minimal or no specific training examples. For example, OpenAI’s GPT models and models like LUKE (Language Understanding with Knowledge-Enhanced) are pushing boundaries in this area.
Multimodal NER
Traditional NER focuses solely on text, but multimodal approaches incorporate images, audio, or video to improve entity recognition. Consequently, these models can leverage visual contexts to better identify entities mentioned in captions or transcripts.
Continual Learning for Evolving Domains
In rapidly changing fields like medicine or technology, new entities emerge constantly. Continual learning techniques allow NER models to adapt to these changes without forgetting previously learned information.
Conclusion: Your NER Journey Has Just Begun
Throughout this guide, we’ve explored the fundamentals of named entity recognition, built models from scratch, and examined advanced optimization techniques. However, mastering NER is a continuous journey of learning and refinement.
As you implement your own NER solutions, remember that success often comes from iterative improvement and domain-specific customization. Furthermore, don’t hesitate to experiment with the latest research and techniques—the field is evolving rapidly, and staying current will give you a competitive edge.
I hope this guide has equipped you with the knowledge and confidence to develop high-accuracy NER models for your unique applications. Meanwhile, I’d love to hear about your experiences and challenges in the comments below!
References and Resources
- spaCy Documentation
- Hugging Face Transformers Documentation: Token Classification.
- Stanford NER Project
- Lample, G., Ballesteros, M., Subramanian, S., Kawakami, K., & Dyer, C. (2016). Neural Architectures for Named Entity Recognition. Proceedings of NAACL-HLT 2016.
- ArXiv NER Research Papers
- Enhancing Customer Support WIth NLP
SEO Solution
says:
Some really prime content on this web site, bookmarked.
how to find toxic backlinks in semrush
says:
glad to be one of several visitants on this awesome site : D.