
Introduction: The SwiftUI Revolution
Have you ever dreamed of building stunning iOS interfaces without the hassle of complex code? Well, SwiftUI makes this dream a reality. First introduced at WWDC 2019, SwiftUI has completely transformed how developers approach iOS app development. Moreover, it offers a declarative syntax that simplifies the creation of user interfaces across all Apple platforms.
As a developer who’s worked with UIKit for years, I was initially skeptical about switching to It. However, after diving into this framework, I quickly realized its immense potential. Furthermore, SwiftUI’s approach to building interfaces is not only more intuitive but also significantly more efficient.
Understanding SwiftUI’s Core Principles
Declarative Syntax: The Game-Changer
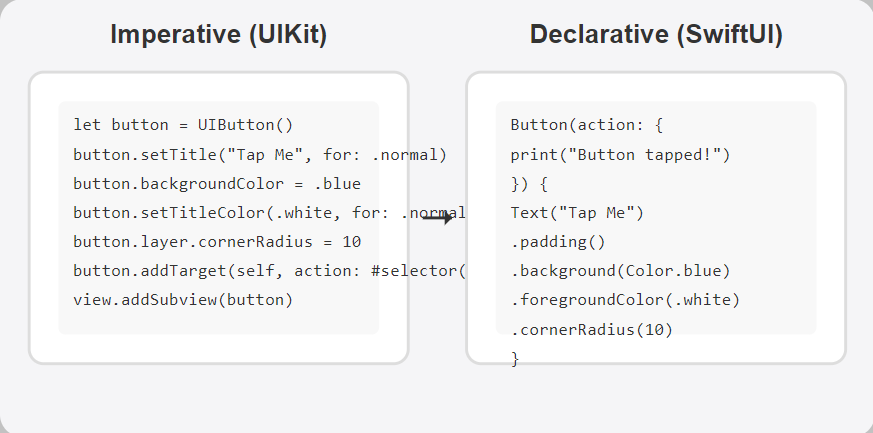
In contrast to UIKit’s imperative approach, It uses declarative syntax. This means you simply state what your UI should look like and how it should behave in different states. Consequently, you write less code and focus more on design.
Here’s a simple example of a button in SwiftUI:
Button(action: {
    print("Button tapped!")
}) {
    Text("Tap Me")
        .padding()
        .background(Color.blue)
        .foregroundColor(.white)
        .cornerRadius(10)
}
Notice how readable and concise the code is? Meanwhile, achieving the same result in UIKit would require significantly more lines of code.
Live Previews: See Changes in Real-Time
One of the most revolutionary features of SwiftUI is live previews. In essence, you can see your UI updates in real-time without having to build and run your app repeatedly. As a result, the development process becomes much faster and more enjoyable.
To enable previews, simply add a preview provider to your SwiftUI file:
struct ContentView_Previews: PreviewProvider {
    static var previews: some View {
        ContentView()
            .previewDevice("iPhone 13 Pro")
    }
}
Additionally, you can preview your UI in different device sizes and orientations simultaneously, which is particularly helpful for ensuring your app looks great on all devices.
Building Your First SwiftUI Interface
Getting Started with Views
The foundation of any SwiftUI interface is the View protocol. In other words, everything you see on screen is a View. Furthermore, SwiftUI provides numerous built-in views like Text, Image, Button, and Stack views for layout.
Let’s create a simple profile card:
struct ProfileCard: View {
    var body: some View {
        VStack {
            Image("profile")
                .resizable()
                .aspectRatio(contentMode: .fit)
                .frame(width: 100, height: 100)
                .clipShape(Circle())
                .overlay(Circle().stroke(Color.blue, lineWidth: 2))

            Text("Jane Doe")
                .font(.title)
                .fontWeight(.bold)

            Text("iOS Developer")
                .font(.subheadline)
                .foregroundColor(.secondary)
        }
        .padding()
        .background(Color.white)
        .cornerRadius(10)
        .shadow(radius: 5)
    }
}
Above all, note how each view modifier returns a new view, allowing for a fluent interface style of programming.
Mastering Layout with Stacks
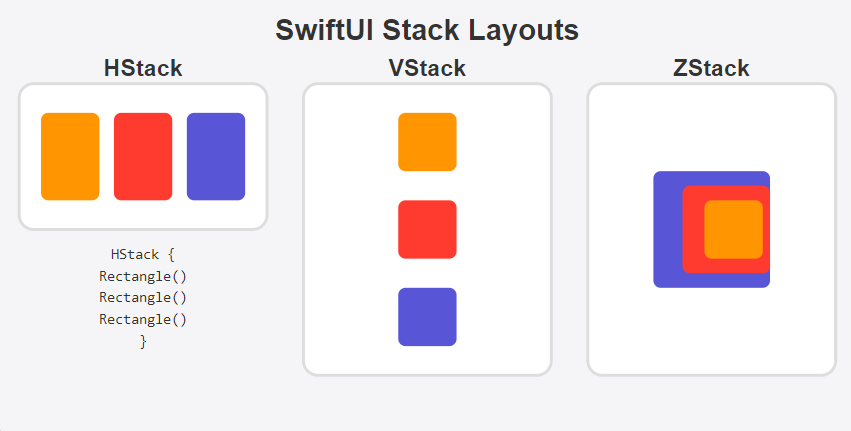
It offers three primary stack views for layout: VStack (vertical), HStack (horizontal), and ZStack (overlapping). Therefore, you can create complex layouts by combining these stacks.
For instance, here’s how to create a card with an image and text side by side:
HStack {
    Image("thumbnail")
        .resizable()
        .aspectRatio(contentMode: .fill)
        .frame(width: 80, height: 80)
        .clipped()

    VStack(alignment: .leading) {
        Text("Article Title")
            .font(.headline)
        Text("Published on May 15, 2024")
            .font(.caption)
            .foregroundColor(.gray)
    }

    Spacer()
}
.padding()
.background(Color.white)
.cornerRadius(8)
Meanwhile, the Spacer() view is used to push content to the sides, creating a flexible layout.
Advanced SwiftUI Techniques
State and Data Flow
It uses a robust system for managing state and data flow. Indeed, this is one of its most powerful features. To begin with, let’s look at the @State property wrapper:
struct CounterView: View {
    @State private var count = 0

    var body: some View {
        VStack {
            Text("Count: \(count)")
                .font(.largeTitle)

            Button("Increment") {
                count += 1
            }
            .padding()
            .background(Color.green)
            .foregroundColor(.white)
            .cornerRadius(8)
        }
    }
}
In this example, whenever the count changes, SwiftUI automatically updates the view. Besides @State, It offers other property wrappers like @Binding, @ObservedObject, and @EnvironmentObject for different data flow scenarios.
Creating Custom ViewModifiers in SwiftUI
For reusable styling, you can create custom view modifiers. For example:
struct RoundedButtonStyle: ViewModifier {
    var backgroundColor: Color

    func body(content: Content) -> some View {
        content
            .padding()
            .background(backgroundColor)
            .foregroundColor(.white)
            .cornerRadius(10)
            .shadow(radius: 3)
    }
}

extension View {
    func roundedButton(color: Color = .blue) -> some View {
        self.modifier(RoundedButtonStyle(backgroundColor: color))
    }
}

// Usage
Button("Sign Up") {
    // Action
}
.roundedButton(color: .purple)
As shown above, custom modifiers help maintain consistent styling throughout your app.
Animations and Transitions in SwiftUI
Fluid Animations Made Easy
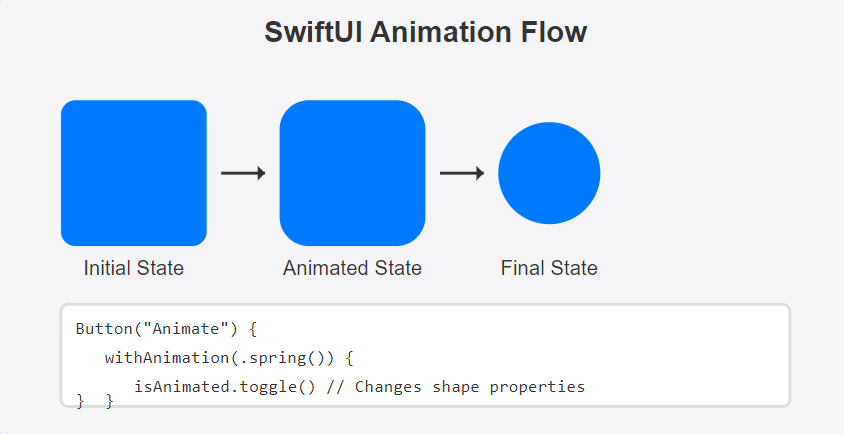
It makes animations surprisingly simple. In fact, you can animate changes to your views with just a few lines of code:
struct AnimationDemo: View {
    @State private var isExpanded = false

    var body: some View {
        VStack {
            Button("Toggle") {
                withAnimation(.spring()) {
                    isExpanded.toggle()
                }
            }

            Rectangle()
                .fill(Color.blue)
                .frame(width: isExpanded ? 300 : 100, height: isExpanded ? 300 : 100)
                .cornerRadius(isExpanded ? 50 : 10)
                .rotation3DEffect(
                    .degrees(isExpanded ? 180 : 0),
                    axis: (x: 0, y: 1, z: 0)
                )
        }
    }
}
Therefore, when the button is tapped, the rectangle smoothly animates between two states.
Custom Transitions
Similarly, you can create custom transitions for views appearing and disappearing:struct CustomTransitionDemo: View {
@State private var showDetails = false
var body: some View {
VStack {
Button("Show Details") {
withAnimation {
showDetails.toggle()
}
}
if showDetails {
DetailView()
.transition(.asymmetric(
insertion: .scale.combined(with: .opacity),
removal: .slide.combined(with: .opacity)
))
}
}
}
}Ultimately, these animations and transitions add polish to your app with minimal effort.
SwiftUI and UIKit Integration
Bridging the Gap
Despite it’s advantages, you might still need to use UIKit components. Fortunately, it provides ways to integrate UIKit views:
struct UIKitMapView: UIViewRepresentable {
    func makeUIView(context: Context) -> MKMapView {
        MKMapView()
    }

    func updateUIView(_ uiView: MKMapView, context: Context) {
        // Update the view
    }
}

// Usage
UIKitMapView()
    .frame(height: 300)
Likewise, you can use SwiftUI views in UIKit with the UIHostingController class.
Best Practices for SwiftUI Development
Performance Optimization
While it is efficient, you should still follow best practices for optimal performance:
- Use
@Statefor simple properties within a view - Employ
@ObservedObjectfor more complex external state - Extract subviews to improve readability and performance
- Use
LazyVStackandLazyHStackfor large lists
Additionally, consider using the Instruments app to profile your ios app and identify performance bottlenecks.
Accessibility Considerations
SwiftUI provides excellent accessibility support out of the box. Nevertheless, you should enhance it further:
Image("logo")
    .accessibilityLabel("Company Logo")

Button(action: signIn) {
    Text("Sign In")
}
.accessibilityHint("Double tap to sign into your account")
In fact, making your app accessible not only helps users with disabilities but also improves the experience for everyone.
Cross-Platform Development
One Codebase, Multiple Platforms
Perhaps the most exciting aspect of SwiftUI is its ability to work across all Apple platforms. To clarify, you can build apps for iOS, macOS, watchOS, and tvOS using largely the same codebase.
For platform-specific features, use conditional compilation:
VStack {
    #if os(iOS)
    Text("This is an iOS app")
    #elseif os(macOS)
    Text("This is a macOS app")
    #endif

    // Common UI elements
    Button("Continue") {
        // Action
    }
}
Therefore, you can maximize code reuse while still tailoring experiences for each platform.
Conclusion: Embracing the Future of iOS Development
It represents the future of app development across Apple’s ecosystem. Although it may seem challenging at first, especially for developers accustomed to UIKit, the learning curve is worth it. In essence, SwiftUI enables you to build beautiful, dynamic interfaces with less code and greater flexibility.
As you begin your SwiftUI journey, remember that practice is key. Start with simple views and gradually incorporate more advanced features. Before long, you’ll wonder how you ever managed without SwiftUI’s elegant approach to UI development.
Have you started using SwiftUI in your projects? What has been your experience so far? Let me know in the comments below!
Resources
📌 Official Documentation & Guides
- SwiftUI Official Documentation – Apple
A comprehensive guide to SwiftUI, including all available components, modifiers, and best practices. - SwiftUI Tutorials – Apple Developer
Step-by-step tutorials from Apple to help you master SwiftUI with real-world examples. - Kotlin Made Easy: Build Your Dream Android App
📌 Community & Learning Platforms
- Swift Forums – Apple Developer
Join the Swift community to discuss SwiftUI features, ask questions, and share knowledge. - Hacking with Swift – SwiftUI Tutorials
A well-structured learning resource with hands-on projects and detailed explanations. - Raywenderlich SwiftUI Tutorials
Learn SwiftUI with real-world projects and in-depth video tutorials.
📌 GitHub Repositories for SwiftUI Projects
- SwiftUI Examples – GitHub
A collection of beautifully designed SwiftUI examples and animations. - Awesome SwiftUI – GitHub
A curated list of open-source SwiftUI projects, libraries, and learning resources.
📌 Tools & Resources for UI/UX Designers
- SF Symbols – Apple
Apple’s official icon library, optimized for SwiftUI and iOS development. - Figma SwiftUI Library
Pre-made SwiftUI components for designing app interfaces before coding.