
Introduction
Have you ever dreamed of creating your own Android app but felt overwhelmed by where to start? Rest assured, you’re not alone. Many aspiring developers initially struggle with the first steps. However, with Kotlin now being Google’s preferred language for Android development, there’s never been a better time to dive in. Kotlin offers a modern, concise, and powerful approach to Android development that can make your journey both enjoyable and productive.
In this comprehensive guide, I’ll walk you through building your first Android app with Kotlin from scratch. As someone who has spent over a decade in software development, I’ve seen firsthand how Kotlin has revolutionized the Android ecosystem. Furthermore, I’ll share practical tips and insights that I’ve gathered from my experiences to help you avoid common pitfalls.
Why Choose Kotlin for Android Development?
Before we dive into coding, let’s understand why Kotlin has become such a game-changer for Android development.
Kotlin is a modern programming language that runs on the Java Virtual Machine. Consequently, it’s fully compatible with Java, which means you can use all the existing Android libraries. Additionally, Kotlin is concise and expressive, reducing the amount of boilerplate code you need to write. Above all, it includes many safety features that help prevent common programming errors like null pointer exceptions.
Google officially announced Kotlin as the preferred language for Android app development in 2019. Therefore, learning Kotlin is undoubtedly a valuable investment for your future in Android development. Meanwhile, the community support continues to grow, with numerous resources becoming available for learners.
Setting Up Your Development Environment
Installing Android Studio
First things first, you’ll need to set up your development environment. Android Studio is the official Integrated Development Environment (IDE) for Android development.
- Download Android Studio from the official website
- Follow the installation instructions for your operating system
- Once installed, open Android Studio and complete the initial setup wizard
During setup, make sure to include the Android SDK, Android SDK Platform, and a recent Android Virtual Device (AVD). In addition, Android Studio will automatically install the necessary Kotlin plugins.
Creating a New Kotlin Project
Now that you have Android Studio ready, let’s create your first Kotlin project:
- Launch Android Studio and click on “New Project”
- Select “Empty Activity” and click “Next”
- Fill in the following details:
- Name: MyFirstKotlinApp (or any name you prefer)
- Package name: com.example.myfirstkotlinapp (use your domain if available)
- Save location: Choose where to save your project
- Language: Kotlin
- Minimum SDK: API 21: Android 5.0 (Lollipop) or higher
- Click “Finish” to create the project
Android Studio will then initialize your project with the basic structure. Moreover, it will generate the necessary files for your first app.
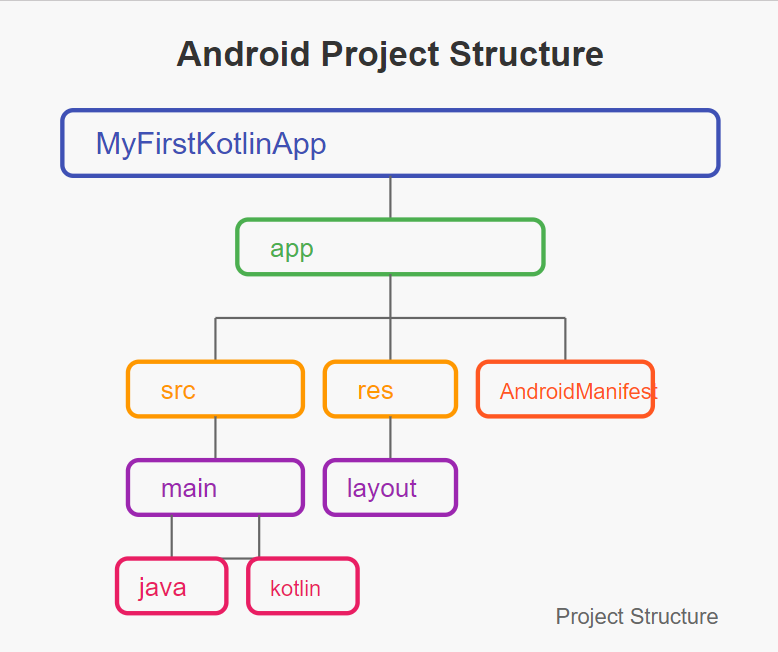
Understanding the Project Structure
Once your project is created, you’ll see several files and folders. Let’s break down the most important ones:
- app/src/main/java/: Contains your Kotlin code files
- app/src/main/res/: Contains resources like layouts, images, and strings
- app/src/main/AndroidManifest.xml: Defines the essential information about your app
- build.gradle: Contains build configuration details
In particular, the res folder is divided into several subfolders:
- layout/: XML files that define the UI of your app
- values/: Contains strings, colors, and styles
- drawable/: Contains images and other graphical assets
Meanwhile, the MainActivity.kt file in the java folder is where your app starts. It’s the entry point of your application.
Building Your First Screen
Understanding XML Layouts
Android uses XML files to define the user interface of your app. These files are stored in the res/layout directory.
Open the activity_main.xml file in the res/layout folder. You’ll see a visual editor and an XML editor. The visual editor shows a preview of your layout, while the XML editor shows the underlying code.
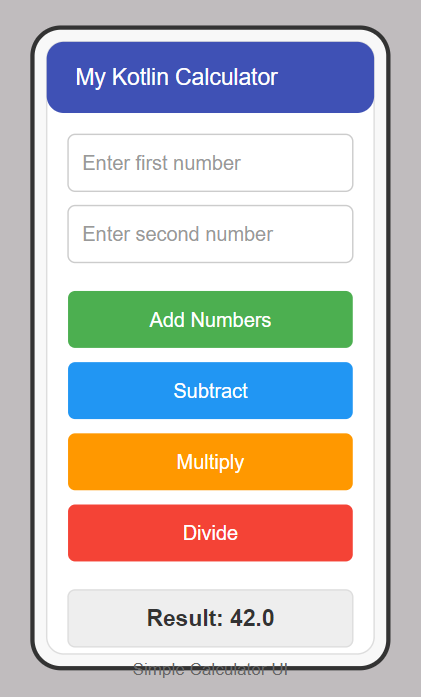
Let’s modify the layout to create a simple calculator app:
<?xml version="1.0" encoding="utf-8"?>
<androidx.constraintlayout.widget.ConstraintLayout
    xmlns:android="http://schemas.android.com/apk/res/android"
    xmlns:app="http://schemas.android.com/apk/res-auto"
    xmlns:tools="http://schemas.android.com/tools"
    android:layout_width="match_parent"
    android:layout_height="match_parent"
    tools:context=".MainActivity">

    <EditText
        android:id="@+id/editTextNumber1"
        android:layout_width="0dp"
        android:layout_height="wrap_content"
        android:layout_marginStart="16dp"
        android:layout_marginTop="32dp"
        android:layout_marginEnd="16dp"
        android:ems="10"
        android:hint="Enter first number"
        android:inputType="numberDecimal"
        app:layout_constraintEnd_toEndOf="parent"
        app:layout_constraintStart_toStartOf="parent"
        app:layout_constraintTop_toTopOf="parent" />

    <EditText
        android:id="@+id/editTextNumber2"
        android:layout_width="0dp"
        android:layout_height="wrap_content"
        android:layout_marginStart="16dp"
        android:layout_marginTop="16dp"
        android:layout_marginEnd="16dp"
        android:ems="10"
        android:hint="Enter second number"
        android:inputType="numberDecimal"
        app:layout_constraintEnd_toEndOf="parent"
        app:layout_constraintStart_toStartOf="parent"
        app:layout_constraintTop_toBottomOf="@+id/editTextNumber1" />

    <Button
        android:id="@+id/buttonAdd"
        android:layout_width="0dp"
        android:layout_height="wrap_content"
        android:layout_marginStart="16dp"
        android:layout_marginTop="16dp"
        android:layout_marginEnd="16dp"
        android:text="Add Numbers"
        app:layout_constraintEnd_toEndOf="parent"
        app:layout_constraintStart_toStartOf="parent"
        app:layout_constraintTop_toBottomOf="@+id/editTextNumber2" />

    <TextView
        android:id="@+id/textViewResult"
        android:layout_width="0dp"
        android:layout_height="wrap_content"
        android:layout_marginStart="16dp"
        android:layout_marginTop="16dp"
        android:layout_marginEnd="16dp"
        android:text="Result will appear here"
        android:textAlignment="center"
        android:textSize="24sp"
        app:layout_constraintEnd_toEndOf="parent"
        app:layout_constraintStart_toStartOf="parent"
        app:layout_constraintTop_toBottomOf="@+id/buttonAdd" />

</androidx.constraintlayout.widget.ConstraintLayout>
This layout creates a simple calculator with two input fields, an “Add Numbers” button, and a text view to display the result.
Writing Kotlin Code
Now, let’s implement the functionality in our MainActivity.kt file:
package com.example.myfirstkotlinapp
import androidx.appcompat.app.AppCompatActivity
import android.os.Bundle
import android.widget.Button
import android.widget.EditText
import android.widget.TextView
import android.widget.Toast
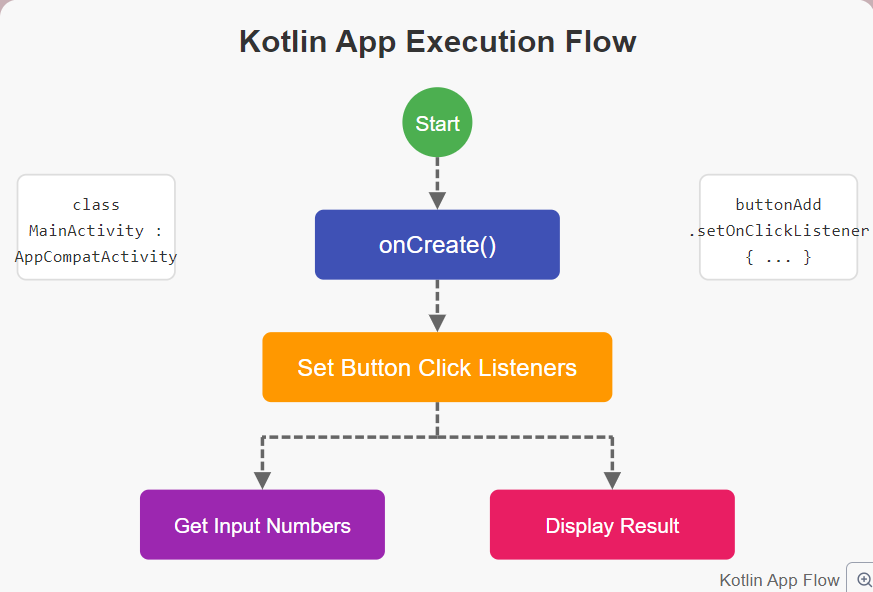
class MainActivity : AppCompatActivity() {
override fun onCreate(savedInstanceState: Bundle?) {
super.onCreate(savedInstanceState)
setContentView(R.layout.activity_main)
// Find the views by their IDs
val editTextNumber1 = findViewById<EditText>(R.id.editTextNumber1)
val editTextNumber2 = findViewById<EditText>(R.id.editTextNumber2)
val buttonAdd = findViewById<Button>(R.id.buttonAdd)
val textViewResult = findViewById<TextView>(R.id.textViewResult)
// Set click listener for the button
buttonAdd.setOnClickListener {
// Get the numbers from the EditText fields
val number1Text = editTextNumber1.text.toString()
val number2Text = editTextNumber2.text.toString()
// Check if the input fields are not empty
if (number1Text.isEmpty() || number2Text.isEmpty()) {
Toast.makeText(this, "Please enter both numbers", Toast.LENGTH_SHORT).show()
return@setOnClickListener
}
try {
// Convert the strings to numbers
val number1 = number1Text.toDouble()
val number2 = number2Text.toDouble()
// Calculate the sum
val sum = number1 + number2
// Display the result
textViewResult.text = "Result: $sum"
} catch (e: NumberFormatException) {
Toast.makeText(this, "Please enter valid numbers", Toast.LENGTH_SHORT).show()
}
}
}
}This code does the following:
- Finds the views in our layout
- Sets a click listener on the “Add Numbers” button
- Gets the numbers from the input fields
- Validates the input
- Calculates the sum and displays the result
Running Your App
Now it’s time to see your app in action! You can run your app in two ways:
Using a Physical Device
To run your app on a physical device:
- Connect your Android device to your computer using a USB cable
- Enable USB debugging on your device (Settings > Developer options > USB debugging)
- In Android Studio, select your device from the dropdown in the toolbar
- Click the “Run” button (green triangle)
Using an Emulator
To run your app on an emulator:
- Open the AVD Manager (Tools > AVD Manager)
- Create a new virtual device or select an existing one
- Select the device and click “Start”
- In Android Studio, select the emulator from the dropdown in the toolbar
- Click the “Run” button
Either way, Android Studio will build your app and install it on the device or emulator. Consequently, you’ll see your app running with the calculator interface.
Adding More Features
Implementing Multiple Operations
Let’s enhance our calculator to perform multiple operations. First, update the layout:
<!-- Add these buttons after the "Add" button -->
<Button
    android:id="@+id/buttonSubtract"
    android:layout_width="0dp"
    android:layout_height="wrap_content"
    android:layout_marginStart="16dp"
    android:layout_marginTop="8dp"
    android:layout_marginEnd="16dp"
    android:text="Subtract"
    app:layout_constraintEnd_toEndOf="parent"
    app:layout_constraintStart_toStartOf="parent"
    app:layout_constraintTop_toBottomOf="@+id/buttonAdd" />

<Button
    android:id="@+id/buttonMultiply"
    android:layout_width="0dp"
    android:layout_height="wrap_content"
    android:layout_marginStart="16dp"
    android:layout_marginTop="8dp"
    android:layout_marginEnd="16dp"
    android:text="Multiply"
    app:layout_constraintEnd_toEndOf="parent"
    app:layout_constraintStart_toStartOf="parent"
    app:layout_constraintTop_toBottomOf="@+id/buttonSubtract" />

<Button
    android:id="@+id/buttonDivide"
    android:layout_width="0dp"
    android:layout_height="wrap_content"
    android:layout_marginStart="16dp"
    android:layout_marginTop="8dp"
    android:layout_marginEnd="16dp"
    android:text="Divide"
    app:layout_constraintEnd_toEndOf="parent"
    app:layout_constraintStart_toStartOf="parent"
    app:layout_constraintTop_toBottomOf="@+id/buttonMultiply" />
Then, update the MainActivity.kt to handle these new operations:
// Add these buttons to the existing code
val buttonSubtract = findViewById<Button>(R.id.buttonSubtract)
val buttonMultiply = findViewById<Button>(R.id.buttonMultiply)
val buttonDivide = findViewById<Button>(R.id.buttonDivide)

// Function to get numbers from input fields
fun getInputNumbers(): Pair<Double, Double>? {
    val number1Text = editTextNumber1.text.toString()
    val number2Text = editTextNumber2.text.toString()

    if (number1Text.isEmpty() || number2Text.isEmpty()) {
        Toast.makeText(this, "Please enter both numbers", Toast.LENGTH_SHORT).show()
        return null
    }

    try {
        val number1 = number1Text.toDouble()
        val number2 = number2Text.toDouble()
        return Pair(number1, number2)
    } catch (e: NumberFormatException) {
        Toast.makeText(this, "Please enter valid numbers", Toast.LENGTH_SHORT).show()
        return null
    }
}

// Set click listeners for the new buttons
buttonSubtract.setOnClickListener {
    val numbers = getInputNumbers() ?: return@setOnClickListener
    val result = numbers.first - numbers.second
    textViewResult.text = "Result: $result"
}

buttonMultiply.setOnClickListener {
    val numbers = getInputNumbers() ?: return@setOnClickListener
    val result = numbers.first * numbers.second
    textViewResult.text = "Result: $result"
}

buttonDivide.setOnClickListener {
    val numbers = getInputNumbers() ?: return@setOnClickListener
    if (numbers.second == 0.0) {
        Toast.makeText(this, "Cannot divide by zero", Toast.LENGTH_SHORT).show()
        return@setOnClickListener
    }
    val result = numbers.first / numbers.second
    textViewResult.text = "Result: $result"
}
With these changes, your calculator now supports addition, subtraction, multiplication, and division.
Improving the User Experience
Adding Themes and Styles
To make your app more visually appealing, you can customize its appearance using themes and styles. Open the res/values/themes.xml file and modify it:
<style name="Theme.MyFirstKotlinApp" parent="Theme.MaterialComponents.DayNight.DarkActionBar">
    <!-- Primary brand color. -->
    <item name="colorPrimary">@color/purple_500</item>
    <item name="colorPrimaryVariant">@color/purple_700</item>
    <item name="colorOnPrimary">@color/white</item>
    <!-- Secondary brand color. -->
    <item name="colorSecondary">@color/teal_200</item>
    <item name="colorSecondaryVariant">@color/teal_700</item>
    <item name="colorOnSecondary">@color/black</item>
    <!-- Status bar color. -->
    <item name="android:statusBarColor">?attr/colorPrimaryVariant</item>
    <!-- Button style. -->
    <item name="buttonStyle">@style/Widget.MyApp.Button</item>
</style>

<style name="Widget.MyApp.Button" parent="Widget.MaterialComponents.Button">
    <item name="android:textColor">@color/white</item>
    <item name="android:textSize">16sp</item>
    <item name="android:padding">12dp</item>
    <item name="cornerRadius">8dp</item>
</style>
Also, create a new file called styles.xml in the res/values folder:
<?xml version="1.0" encoding="utf-8"?>
<resources>
    <style name="ResultTextStyle">
        <item name="android:textSize">24sp</item>
        <item name="android:textStyle">bold</item>
        <item name="android:textColor">@color/purple_700</item>
    </style>
</resources>
Now, update the textViewResult in your layout to use this style:
<TextView
    android:id="@+id/textViewResult"
    android:layout_width="0dp"
    android:layout_height="wrap_content"
    android:layout_marginStart="16dp"
    android:layout_marginTop="16dp"
    android:layout_marginEnd="16dp"
    android:text="Result will appear here"
    android:textAlignment="center"
    style="@style/ResultTextStyle"
    app:layout_constraintEnd_toEndOf="parent"
    app:layout_constraintStart_toStartOf="parent"
    app:layout_constraintTop_toBottomOf="@+id/buttonDivide" />
Adding Animations
To make your app more engaging, you can add simple animations. Let’s animate the result text when it changes:
Create a new file called fade_in.xml in the res/anim folder (create this folder if it doesn’t exist):
<?xml version="1.0" encoding="utf-8"?>
<alpha xmlns:android="http://schemas.android.com/apk/res/android"
    android:duration="500"
    android:fromAlpha="0.0"
    android:toAlpha="1.0" />
Now, update your code to use this animation when displaying the result:
fun displayResult(result: Double) {
    textViewResult.text = "Result: $result"
    val animation = AnimationUtils.loadAnimation(this, R.anim.fade_in)
    textViewResult.startAnimation(animation)
}
And update all your button click listeners to use this function:
buttonAdd.setOnClickListener {
    val numbers = getInputNumbers() ?: return@setOnClickListener
    val result = numbers.first + numbers.second
    displayResult(result)
}

// Do the same for other operations
Don’t forget to import the animation utilities:
import android.view.animation.AnimationUtilsDebugging and Testing
Debugging with Android Studio
Android Studio provides powerful debugging tools. To debug your app:
- Set breakpoints by clicking in the gutter next to the line numbers
- Run your app in debug mode (Run > Debug)
- When the app hits a breakpoint, you can inspect variables, step through code, and more
Testing Your App
Writing tests for your app ensures it works as expected. Let’s create a simple unit test:
Create a new file called CalculatorTest.kt in the app/src/test/java/com.example.myfirstkotlinapp directory:
package com.example.myfirstkotlinapp

import org.junit.Test
import org.junit.Assert.*

class CalculatorTest {
    @Test
    fun addition_isCorrect() {
        assertEquals(4.0, 2.0 + 2.0, 0.0)
    }

    @Test
    fun subtraction_isCorrect() {
        assertEquals(2.0, 5.0 - 3.0, 0.0)
    }

    @Test
    fun multiplication_isCorrect() {
        assertEquals(6.0, 2.0 * 3.0, 0.0)
    }

    @Test
    fun division_isCorrect() {
        assertEquals(2.0, 6.0 / 3.0, 0.0)
    }
}
To run these tests, right-click on the CalculatorTest.kt file and select “Run ‘CalculatorTest'”.
Publishing Your App
When you’re ready to share your app with the world, you’ll need to publish it to the Google Play Store.
Preparing Your App for Release
- Update the app’s version in the
build.gradlefile - Create a signed APK (Build > Generate Signed Bundle / APK)
- Test the release version on a real device
Publishing to Google Play
- Create a Google Play Developer account
- Set up your app’s store listing
- Upload your APK or App Bundle
- Submit for review
Remember, Google Play has strict policies, so make sure your app complies with them.
Next Steps
Now that you’ve built your first Android app with Kotlin, here are some ideas for further improvement:
- Add more complex calculations like square root, percentage, etc.
- Implement a history feature to keep track of previous calculations
- Add support for different themes (light/dark mode)
- Implement unit conversion functionality
- Learn about saving app state when the device rotates
Conclusion
Congratulations! You’ve successfully built your first Android app with Kotlin. We’ve covered everything from setting up your development environment to publishing your app to the Google Play Store.
Remember, building great apps takes practice and patience. Don’t be afraid to experiment and try new things. The Android and Kotlin communities are vast and supportive, so you’ll always find help when you need it.
Now that you have a solid foundation, you can continue to build more complex and feature-rich apps. The possibilities are endless!
Happy coding!