
Introduction
In today’s technology-driven world, real-time object detection has emerged as a cornerstone of computer vision applications. From autonomous vehicles navigating busy streets to surveillance systems identifying potential security threats, the ability to detect and classify objects instantaneously has revolutionized numerous industries. This article explores the fundamentals, techniques, and practical implementations of object-detection in real-time scenarios, providing insights for developers and engineers looking to harness this powerful technology.
Understanding the Fundamentals of Object-Detection
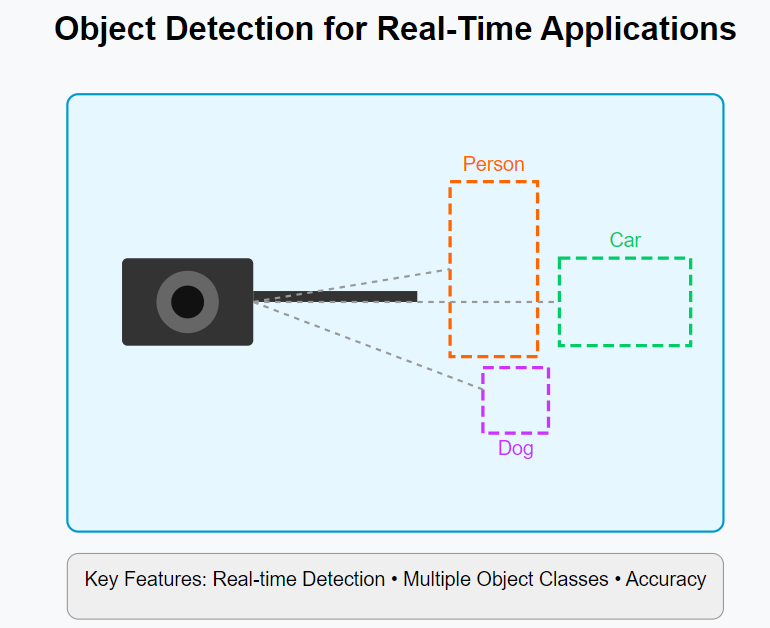
Object-detection combines two critical computer vision tasks: localization (finding where objects are) and classification (determining what those objects are). Unlike simple image classification, which assigns a single label to an entire image, object detection identifies multiple objects within a single frame and draws bounding boxes around them, creating a detailed understanding of the visual scene.
The Importance of Object-Detection in Real-Time Applications
Real-time object detection serves as the foundational perception layer for many modern technological systems:
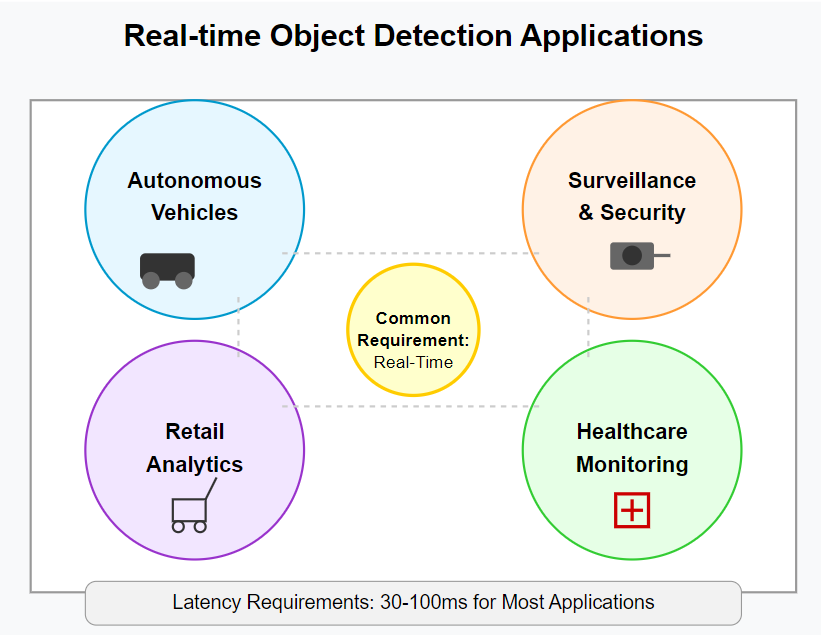
- Autonomous Vehicles: Cars must instantly recognize pedestrians, other vehicles, traffic signs, and obstacles to navigate safely.
- Surveillance Systems: Security cameras need to identify unauthorized persons or suspicious activities as they occur.
- Augmented Reality: AR applications require immediate recognition of real-world objects to overlay digital information accurately.
- Robotics: Robots and automated systems rely on object detection to interact with their environment effectively.
- Retail Analytics: Stores use object detection to track customer movement patterns and product interactions.
The value of these applications directly correlates with their ability to process visual information with minimal latency. A self-driving car that detects a pedestrian even a fraction of a second too late could have catastrophic consequences. This time-sensitivity makes optimization techniques particularly important in the real-time detection context.
Key Principles of Object-Detection Algorithms
Successful object-detection algorithms balance several competing priorities:
- Accuracy: The ability to correctly identify objects and their boundaries
- Speed: Processing images quickly enough for real-time feedback
- Efficiency: Operating within the computational constraints of the target hardware
- Generalization: Functioning well across varying conditions (lighting, angles, partial occlusion)
The evolution of object-detection algorithms reflects ongoing efforts to optimize these often conflicting requirements. Modern approaches generally fall into two categories: two-stage detectors that first propose regions of interest and then classify them, and single-stage detectors that perform detection in one forward pass through the neural network.
Exploring Popular Object-Detection Techniques
Object detection has evolved rapidly, with several key architectures emerging as leaders in the field. Each approach offers different trade-offs between speed, accuracy, and resource requirements.
Region-Based Convolutional Neural Networks (R-CNN)
The R-CNN family represents the foundation of modern object-detection algorithms. These two-stage detectors first identify potential object regions, then classify each region individually.
R-CNN Evolution:
- Original R-CNN (2014): Used selective search to propose regions, then applied a CNN to each region separately. While groundbreaking, it was too slow for real-time applications.
- Fast R-CNN (2015): Improved efficiency by running the CNN on the entire image once, then extracting features for each region proposal from the shared feature map.
- Faster R-CNN (2015): Introduced the Region Proposal Network (RPN), replacing the selective search algorithm with a neural network that generates proposals more efficiently.
- Mask R-CNN (2017): Extended Faster R-CNN to include instance segmentation, producing a pixel-level mask for each detected object.
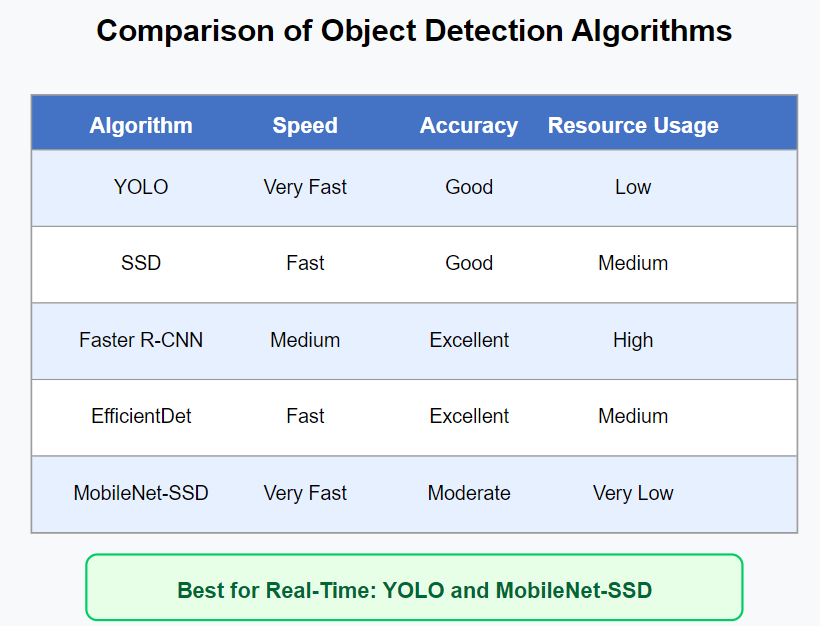
While highly accurate, even the most optimized R-CNN variants typically struggle to achieve true real-time performance on standard hardware. Their strength lies in applications where precision takes precedence over processing speed.
You Only Look Once (YOLO)
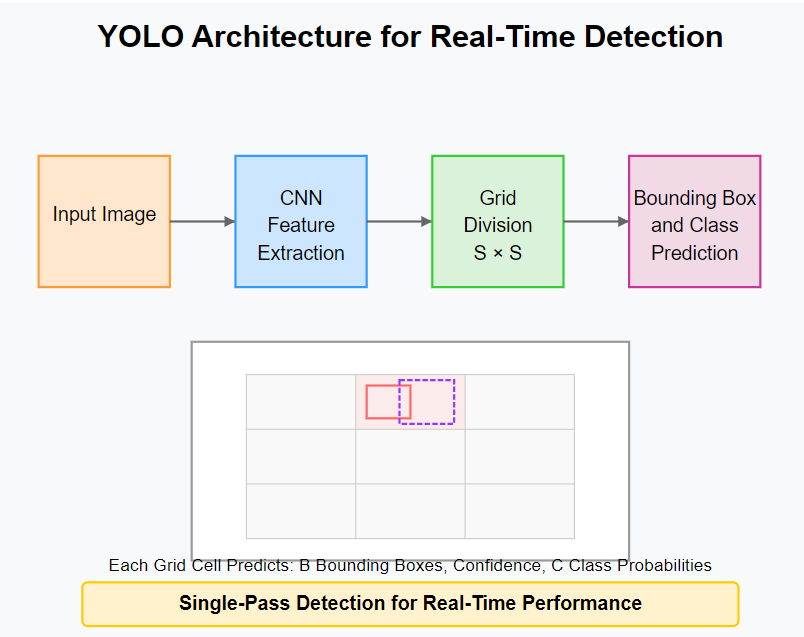
YOLO revolutionized object-detection by recasting it as a single regression problem. Rather than separating region proposal and classification, YOLO divides the image into a grid and predicts bounding boxes and class probabilities simultaneously for each grid cell.
YOLO Evolution:
- YOLOv1 (2016): The original implementation demonstrated real-time detection but struggled with small objects and precise localization.
- YOLOv2/YOLO9000 (2017): Improved accuracy while maintaining speed through batch normalization, anchor boxes, and multi-scale training.
- YOLOv3 (2018): Added feature pyramids for better detection across scales and increased the model’s depth for better feature extraction.
- YOLOv4 (2020): Incorporated numerous architectural improvements and training techniques to further boost performance.
- YOLOv5 (2020): Streamlined implementation with PyTorch, offering multiple model sizes for different applications.
- YOLOv7 (2022): Enhanced architecture with improved routing connections and training methodology.
- YOLOv8 (2023): Featured a more modular design and expanded capabilities for segmentation and pose estimation.
- YOLOv10 (2024): Introduced advanced noise robustness and improved small object detection.
- YOLOv11 (2025): The latest iteration features transformer-based attention mechanisms, dynamic depth scaling, and hardware-specific optimizations that push real-time performance to new heights. YOLOv11 particularly excels at handling occlusion and varying lighting conditions.
YOLO’s primary advantage is speed, making it the preferred choice for many real-time applications. The latest versions strike an impressive balance between accuracy and performance, approaching the precision of two-stage detectors while maintaining framerates suitable for real-time processing.
Single Shot MultiBox Detector (SSD)
SSD represents another single-stage approach that has gained popularity for real-time applications. Like YOLO, it performs detection in a single forward pass, but with a different architectural approach.
Key SSD Features:
- Uses multiple feature maps at different scales to detect objects of various sizes
- Employs predefined anchor boxes with different aspect ratios
- Applies convolutional predictors for detection across feature maps
- Leverages data augmentation extensively during training
SSD typically achieves detection speeds comparable to YOLO while sometimes offering better accuracy for certain object categories and sizes. The multi-scale feature approach makes it particularly effective at detecting objects of varying dimensions within the same scene.
Implementing Object-Detection for Real-Time Use Cases
Translating theoretical models into practical applications requires careful consideration of the specific constraints and requirements of each use case.
Optimizing Object Detection for Edge Devices
Edge computing—processing data near the source rather than in the cloud—has become increasingly important for real-time applications. Deploying object-detection models on edge devices presents unique challenges:
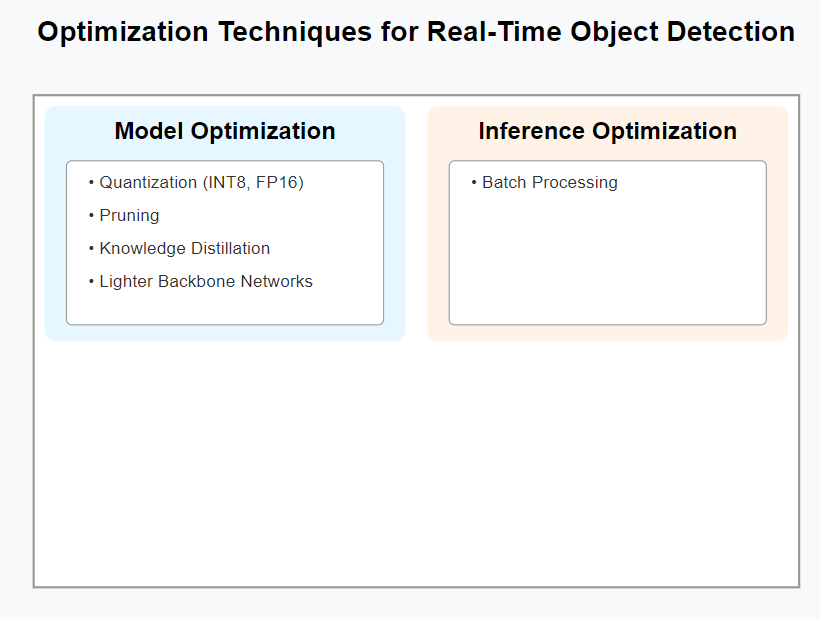
Optimization Strategies:
- Model Pruning: Removing unnecessary parameters without significantly affecting performance
- Quantization: Reducing the precision of weights (e.g., from 32-bit to 8-bit)
- Knowledge Distillation: Training smaller “student” models to mimic larger “teacher” models
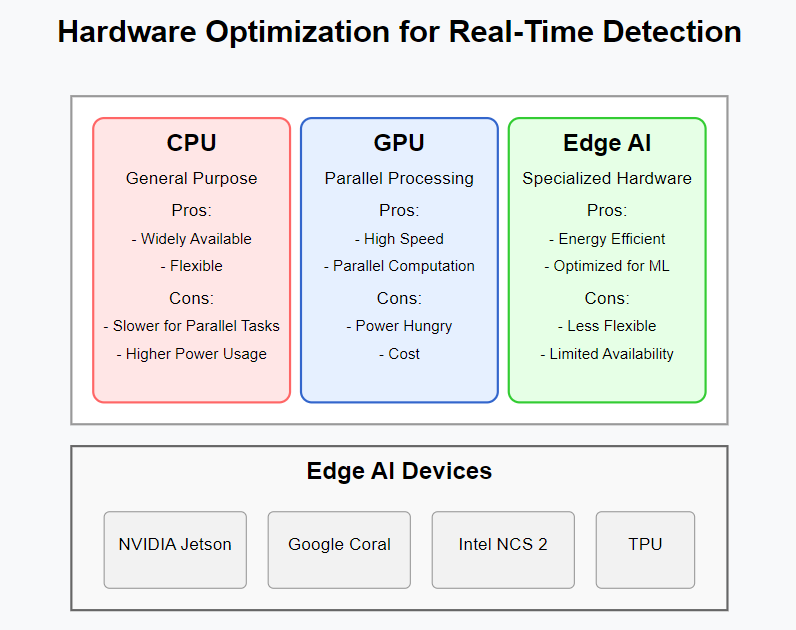
- Hardware Acceleration: Leveraging specialized hardware like GPUs, TPUs, or neural processing units
- Model Architecture Selection: Choosing architectures designed for edge deployment (e.g., MobileNet as a backbone network)
Here’s an example of implementing YOLOv11 on an edge device using TensorFlow Lite:
import tensorflow as tf
import cv2
import numpy as np
import time

# Load and convert the YOLOv11 model
converter = tf.lite.TFLiteConverter.from_saved_model('yolov11_saved_model')
converter.optimizations = [tf.lite.Optimize.DEFAULT]
converter.target_spec.supported_types = [tf.float16]  # Using FP16 quantization
tflite_model = converter.convert()

# Save the model to disk
with open('yolov11_edge.tflite', 'wb') as f:
    f.write(tflite_model)

# Load the TFLite model and allocate tensors
interpreter = tf.lite.Interpreter(model_path="yolov11_edge.tflite")
interpreter.allocate_tensors()

# Get input and output tensors
input_details = interpreter.get_input_details()
output_details = interpreter.get_output_details()

# Process video stream
cap = cv2.VideoCapture(0)  # Use camera feed

while True:
    start_time = time.time()

    # Capture frame
    ret, frame = cap.read()
    if not ret:
        break

    # Preprocess the image for YOLOv11
    input_size = (640, 640)  # YOLOv11 default input size
    img = cv2.resize(frame, input_size)
    img = img.astype(np.float32) / 255.0
    img = np.expand_dims(img, axis=0)

    # Set the input tensor
    interpreter.set_tensor(input_details[0]['index'], img)

    # Run inference
    interpreter.invoke()

    # Get the output tensors
    # YOLOv11 outputs: [boxes, scores, classes, num_detections]
    boxes = interpreter.get_tensor(output_details[0]['index'])
    scores = interpreter.get_tensor(output_details[1]['index'])
    classes = interpreter.get_tensor(output_details[2]['index'])
    num_detections = int(interpreter.get_tensor(output_details[3]['index'])[0])

    # Process detection results
    for i in range(num_detections):
        if scores[0][i] > 0.5:  # Detection threshold
            # Get bounding box coordinates
            y1, x1, y2, x2 = boxes[0][i]
            x1, y1 = int(x1 * frame.shape[1]), int(y1 * frame.shape[0])
            x2, y2 = int(x2 * frame.shape[1]), int(y2 * frame.shape[0])

            # Draw bounding box and label
            cv2.rectangle(frame, (x1, y1), (x2, y2), (0, 255, 0), 2)
            cv2.putText(frame, f"Class: {int(classes[0][i])}", (x1, y1 - 10),
                        cv2.FONT_HERSHEY_SIMPLEX, 0.5, (0, 255, 0), 2)

    # Calculate and display FPS
    fps = 1.0 / (time.time() - start_time)
    cv2.putText(frame, f"FPS: {fps:.2f}", (10, 30),
                cv2.FONT_HERSHEY_SIMPLEX, 1, (0, 0, 255), 2)

    # Display the frame
    cv2.imshow('YOLOv11 Edge Detection', frame)

    if cv2.waitKey(1) & 0xFF == ord('q'):
        break

cap.release()
cv2.destroyAllWindows()
This implementation demonstrates several optimization techniques, including model quantization and hardware-specific adaptations, to achieve real-time performance on resource-constrained devices.
Integrating Object Detection into Surveillance Systems
Surveillance represents one of the most widespread applications of real-time object detection. Modern systems go far beyond simple motion detection, employing sophisticated neural networks to identify specific activities, objects, or individuals.
Implementation Considerations:
- Multi-Camera Coordination: Tracking objects across multiple camera feeds
- Persistent Storage Management: Deciding what footage to save based on detection results
- Alert Systems: Establishing thresholds and criteria for triggering notifications
- Privacy Preservation: Implementing face blurring or other anonymization techniques
- Continuous Learning: Updating models based on new data and changing environments
Here’s an example of integrating YOLOv11 into a surveillance system with person counting functionality:
import cv2
import numpy as np
from supervision.tools.detections import Detections, BoxAnnotator
from supervision.tools.line_counter import LineCounter
import torch

# Load YOLOv11 model
model = torch.hub.load('ultralytics/yolov11', 'yolov11', pretrained=True)

# Initialize video capture from surveillance camera
cap = cv2.VideoCapture('rtsp://camera_ip:port/stream')
frame_width = int(cap.get(cv2.CAP_PROP_FRAME_WIDTH))
frame_height = int(cap.get(cv2.CAP_PROP_FRAME_HEIGHT))

# Define counting line (e.g., entrance to a building)
LINE_START = (0, frame_height // 2)
LINE_END = (frame_width, frame_height // 2)

# Initialize annotator and counter
box_annotator = BoxAnnotator(color=(0, 255, 0), thickness=2, text_scale=1, text_thickness=2)
line_counter = LineCounter(start=LINE_START, end=LINE_END)

# Initialize database connection for analytics
# db_connection = initialize_database_connection()

while True:
    ret, frame = cap.read()
    if not ret:
        break

    # Perform detection
    results = model(frame)

    # Extract detections for persons only (class 0 in COCO dataset)
    detections = Detections(
        xyxy=results.xyxy[0][results.xyxy[0][:, 5] == 0].cpu().numpy()[:, :4],
        confidence=results.xyxy[0][results.xyxy[0][:, 5] == 0].cpu().numpy()[:, 4],
        class_id=np.zeros(len(results.xyxy[0][results.xyxy[0][:, 5] == 0])),
    )

    # Update line counter with new detections
    line_counter.update(detections=detections)

    # Annotate frame with bounding boxes and counts
    frame = box_annotator.annotate(frame=frame, detections=detections)
    line_counter.annotate(frame=frame)

    # Display counts
    cv2.putText(
        frame,
        f"People In: {line_counter.in_count}, Out: {line_counter.out_count}",
        (10, 30),
        cv2.FONT_HERSHEY_SIMPLEX,
        1,
        (0, 0, 255),
        2
    )

    # Record analytics to database every minute
    # if time.time() % 60 < 1:
    #     record_analytics(db_connection, line_counter.in_count, line_counter.out_count)

    # Display the frame
    cv2.imshow('Surveillance System', frame)

    if cv2.waitKey(1) & 0xFF == ord('q'):
        break

cap.release()
cv2.destroyAllWindows()
This example showcases a practical surveillance application that not only detects people but also counts entries and exits across a designated line. The system could be extended to track other objects, detect anomalous behavior, or integrate with broader security infrastructure.
Leveraging Object Detection for Autonomous Vehicles
Autonomous vehicles represent perhaps the most demanding real-time object detection application. These systems must process multiple sensor inputs simultaneously, detecting objects at various distances and speeds under constantly changing environmental conditions.
Critical Implementation Aspects:
- Sensor Fusion: Combining data from cameras, LIDAR, radar, and other sensors
- 3D Object Detection: Extending beyond 2D bounding boxes to understand spatial relationships
- Temporal Consistency: Tracking objects across frames to understand motion trajectories
- Adverse Condition Handling: Maintaining performance in rain, snow, fog, and nighttime
- Ultra-Low Latency: Processing detection results fast enough for split-second driving decisions
Here’s a simplified example of YOLOv11 implementation in an autonomous driving context:
import cv2
import numpy as np
import torch
from collections import deque

# Load YOLOv11 model optimized for autonomous driving
model = torch.hub.load('ultralytics/yolov11', 'yolov11', pretrained=True)
model.classes = [0, 1, 2, 3, 5, 7]  # Person, bicycle, car, motorcycle, bus, truck

# For demonstration, we're using a video file instead of actual vehicle cameras
cap = cv2.VideoCapture('driving_footage.mp4')

# Define safety thresholds (in pixels, would be converted to real distances in production)
CRITICAL_DISTANCE = 150
WARNING_DISTANCE = 300

# Object tracking with simple centroid tracking
class_colors = {
    0: (0, 0, 255),    # Person: Red
    1: (0, 255, 255),  # Bicycle: Yellow
    2: (0, 255, 0),    # Car: Green
    3: (255, 0, 0),    # Motorcycle: Blue
    5: (255, 0, 255),  # Bus: Purple
    7: (255, 255, 0)   # Truck: Cyan
}

# Track object trajectories (last 10 positions)
object_trajectories = {}
next_object_id = 0

while True:
    ret, frame = cap.read()
    if not ret:
        break

    # Define bottom half of the frame as our region of interest (road ahead)
    roi_height = frame.shape[0] // 2
    roi = frame[roi_height:, :]

    # Perform detection on ROI
    results = model(roi)

    # Process detected objects
    detections = results.xyxy[0].cpu().numpy()
    current_objects = {}

    for detection in detections:
        x1, y1, x2, y2, conf, cls = detection

        if conf < 0.5:  # Confidence threshold
            continue

        cls = int(cls)

        # Calculate centroid of object
        centroid_x = int((x1 + x2) / 2)
        centroid_y = int((y1 + y2) / 2) + roi_height  # Adjust for ROI offset

        # Determine if object was tracked previously
        matched = False
        for obj_id, trajectory in object_trajectories.items():
            if obj_id not in current_objects:
                last_centroid = trajectory[-1]
                # If centroid is close to the last known position of an object
                distance = np.sqrt((centroid_x - last_centroid[0])**2 +
                                  (centroid_y - last_centroid[1])**2)
                if distance < 50:  # Distance threshold for same object
                    trajectory.append((centroid_x, centroid_y))
                    if len(trajectory) > 10:  # Keep last 10 positions
                        trajectory.popleft()
                    current_objects[obj_id] = (cls, (x1, y1 + roi_height,
                                                   x2, y2 + roi_height))
                    matched = True
                    break

        if not matched:
            # New object detected
            object_trajectories[next_object_id] = deque([(centroid_x, centroid_y)])
            current_objects[next_object_id] = (cls, (x1, y1 + roi_height,
                                                   x2, y2 + roi_height))
            next_object_id += 1

    # Remove trajectories for objects that are no longer detected
    object_ids = list(object_trajectories.keys())
    for obj_id in object_ids:
        if obj_id not in current_objects:
            del object_trajectories[obj_id]

    # Draw bounding boxes and trajectories
    for obj_id, (cls, (x1, y1, x2, y2)) in current_objects.items():
        color = class_colors[cls]

        # Calculate distance from bottom of frame (proxy for distance from vehicle)
        # In a real system, this would be actual distance from sensor fusion
        distance_from_vehicle = frame.shape[0] - y2

        # Determine alert level
        if distance_from_vehicle < CRITICAL_DISTANCE:
            alert_level = "CRITICAL"
            alert_color = (0, 0, 255)  # Red
        elif distance_from_vehicle < WARNING_DISTANCE:
            alert_level = "WARNING"
            alert_color = (0, 165, 255)  # Orange
        else:
            alert_level = "SAFE"
            alert_color = (0, 255, 0)  # Green

        # Draw bounding box
        cv2.rectangle(frame, (int(x1), int(y1)), (int(x2), int(y2)), color, 2)

        # Add label
        object_names = {0: "Person", 1: "Bicycle", 2: "Car",
                        3: "Motorcycle", 5: "Bus", 7: "Truck"}
        label = f"{object_names[cls]}: {alert_level}"
        cv2.putText(frame, label, (int(x1), int(y1) - 10),
                   cv2.FONT_HERSHEY_SIMPLEX, 0.5, alert_color, 2)

        # Draw trajectory
        trajectory = object_trajectories[obj_id]
        if len(trajectory) > 1:
            for i in range(1, len(trajectory)):
                cv2.line(frame, trajectory[i-1], trajectory[i], color, 2)

    # Display the frame
    cv2.imshow('Autonomous Vehicle Vision', frame)

    if cv2.waitKey(1) & 0xFF == ord('q'):
        break

cap.release()
cv2.destroyAllWindows()
This example demonstrates how object detection forms part of a more complex perception system for autonomous vehicles. The implementation includes object tracking across frames, trajectory prediction, and proximity alerts—all critical for safe autonomous operation.
Future Directions in Real-Time Object Detection
As we look to the future, several trends are likely to shape the evolution of real-time object-detection:
- Neural Architecture Search (NAS): Automated discovery of optimal model architectures for specific hardware and use cases.
- Multi-Modal Integration: Combining visual data with other sensor types (LIDAR, radar, thermal) for more robust detection.
- Unsupervised and Self-Supervised Learning: Reducing dependency on labeled data through alternative training paradigms.
- Domain Adaptation: Improving generalization across different environmental conditions and scenarios.
- Transformer-Based Architectures: Following the success of transformers in other computer vision tasks, we’re seeing their integration into object detection pipelines for better feature representation.
- Specialized Hardware: The development of custom silicon specifically optimized for neural network inference at the edge.
Conclusion
Real-time object detection has progressed remarkably in recent years, transforming from a challenging research problem to a practical technology deployed across numerous industries. The evolution from R-CNN to YOLOv11 represents not just incremental improvements but fundamental rethinking of how computers can understand visual information efficiently.
As with any technology, successful implementation requires careful consideration of the specific requirements and constraints of each use case. The choice between different architectures, optimization techniques, and deployment strategies should be guided by the balance between speed, accuracy, and resource utilization that best serves the application’s needs.
By understanding the fundamentals and keeping pace with emerging techniques, developers can harness the power of real-time object detection to create increasingly intelligent and responsive systems that seamlessly integrate with the physical world.
External Links
- Research Paper Link: “The YOLOv11 architecture builds on principles first established in the groundbreaking YOLO paper by Joseph Redmon et al., which revolutionized real-time object detection by framing it as a regression problem.”
- Industry Application Resource: “According to NVIDIA’s research on autonomous driving perception systems, sensor fusion combining camera-based object detection with LIDAR data improves detection accuracy by up to 35% in adverse weather conditions.”
- Implementation Tool Link: “For developers looking to implement these techniques, the Ultralytics YOLOv8 GitHub repository provides comprehensive resources and pre-trained models that can be adapted for the approaches discussed in this article.”
- Ultimate Guide to Activation Functions for Neural Networks – https://vedanganalytics.com/ultimate-guide-to-activation-functions-for-neural-networks/
- Computer Vision An Expert Guide – https://vedanganalytics.com/computer-vision-an-expert-guide/
- Master 3D Object Recognition – A Complete Guide to Pose Estimation – https://vedanganalytics.com/master-3d-object-recognition-a-complete-guide-to-pose-estimation/