
Introduction to Stable Diffusion
Stable Diffusion has revolutionized the way we think about image creation. Unlike traditional art tools that require years of practice, this breakthrough AI model allows anyone to generate stunning visuals with just a text description. But what exactly is this magical technology?
What is Stable Diffusion?
Stable Diffusion is an open-source, state-of-the-art text-to-image diffusion model capable of generating photorealistic images from text descriptions. Released in 2022 by Stability AI, this model has democratized image generation by making powerful AI tools accessible to everyone.
At its core, Stable Diffusion works by gradually transforming random noise into a coherent image that matches your text prompt. This transformation happens through a process called “diffusion,” where the model progressively removes noise while incorporating elements from your description.
# Basic concept of diffusion models
import torch
from diffusers import StableDiffusionPipeline

# Load the model
model_id = "runwayml/stable-diffusion-v1-5"
pipe = StableDiffusionPipeline.from_pretrained(model_id, torch_dtype=torch.float16)
pipe = pipe.to("cuda")

# Generate an image from text
prompt = "A serene landscape with mountains reflected in a crystal-clear lake at sunset"
image = pipe(prompt).images[0]

# Save the generated image
image.save("landscape.png")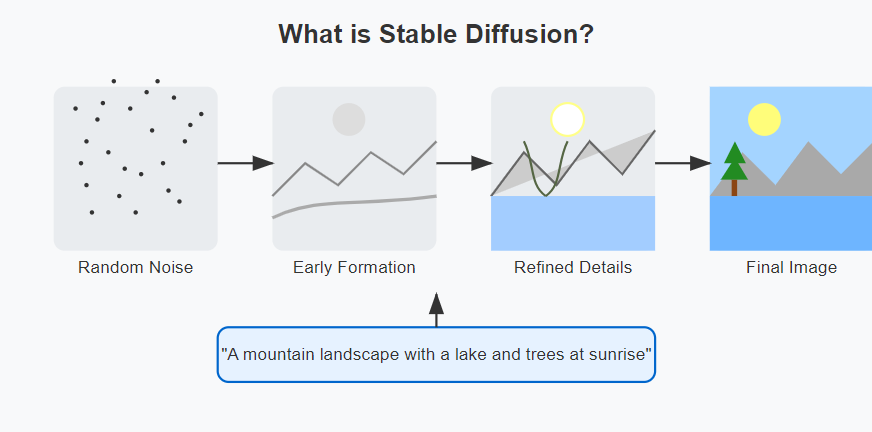
Advantages of Stable Diffusion
What sets Stable Diffusion apart from other AI image generators? Several compelling advantages make it a favorite among creators:
- Open-source accessibility: Unlike many AI systems, Stable Diffusion’s code is freely available, enabling customization and innovation.
- Local deployment: You can run it on your own hardware, ensuring privacy and eliminating ongoing API costs.
- Impressive quality: The model produces high-resolution images with remarkable detail and aesthetic appeal.
- Versatility: From photorealistic scenes to abstract art, Stable Diffusion adapts to various creative needs.
- Active community: A vibrant ecosystem of developers continually improves and extends the model’s capabilities.
Use Cases for Stable Diffusion
The applications of Stable Diffusion extend far beyond simple image creation. Innovative creators are using this technology to:
- Create unique artwork and illustrations for personal projects
- Generate custom graphics for websites, blogs, and social media
- Produce concept art for games, films, and product design
- Augment existing images through techniques like inpainting and style transfer
- Inspire creative thinking by visualizing ideas quickly
- Enhance educational content with visual examples
As an artist, developer, or content creator, Stable Diffusion provides a powerful tool to bring your imagination to life with unprecedented ease and quality.
Getting Started with Stable Diffusion
Ready to dive into the world of AI image generation? Let’s set up your system to run Stable Diffusion effectively.
System Requirements
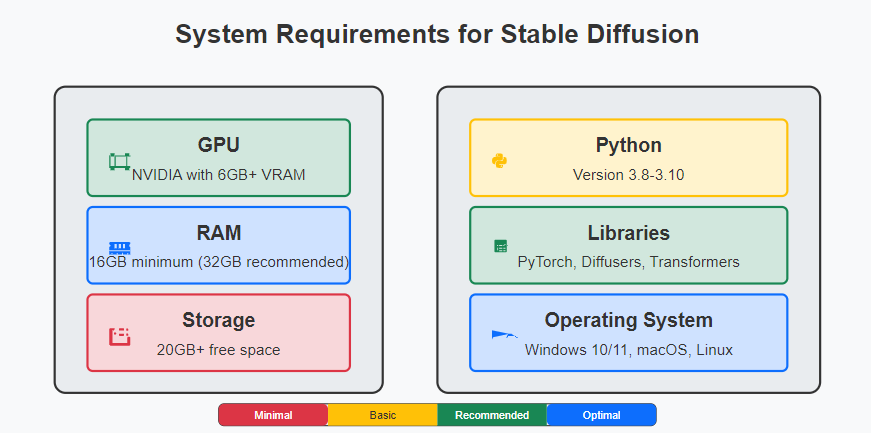
Before installation, ensure your system meets these minimum requirements for a smooth experience:
- GPU: NVIDIA GPU with at least 6GB VRAM (10GB+ recommended for optimal performance)
- RAM: 16GB minimum (32GB recommended)
- Storage: 20GB free space for models and generated images
- Operating System: Windows 10/11, macOS, or Linux
- Python: Version 3.8-3.10
While CPU-only operation is possible, it’s painfully slow. For practical use, a CUDA-compatible NVIDIA GPU is essential. Budget-conscious creators can try cloud solutions like Google Colab as an alternative.
# Check if GPU is available
import torch

has_cuda = torch.cuda.is_available()
gpu_name = torch.cuda.get_device_name(0) if has_cuda else "None"
vram = torch.cuda.get_device_properties(0).total_memory / 1024**3 if has_cuda else 0

print(f"CUDA Available: {has_cuda}")
print(f"GPU: {gpu_name}")
print(f"VRAM: {vram:.2f} GB")

# Check Python version
import sys
print(f"Python Version: {sys.version}")
Installing Stable Diffusion
While there are many ways to install Stable Diffusion, we’ll focus on the most beginner-friendly approach using a pre-built package:
- Install Python: Download and install Python 3.10 from python.org
- Set up a virtual environment:
# Create and activate a virtual environment
# For Windows
python -m venv sd_env
sd_env\Scripts\activate

# For macOS/Linux
python -m venv sd_env
source sd_env/bin/activate
3. Install the diffusers library:
# Install the required packages
pip install diffusers transformers accelerate scipy safetensors
pip install torch torchvision --index-url https://download.pytorch.org/whl/cu118
Alternatively, you can use one of these popular user-friendly interfaces:
- Automatic1111 Web UI: A comprehensive interface with extensive features
- ComfyUI: A node-based interface offering greater control and customization
- InvokeAI: A user-friendly interface with a clean design
For beginners, the Automatic1111 Web UI offers the best balance of features and usability.
Setting Up the Development Environment
Once Stable Diffusion is installed, let’s configure your environment for optimal results:
- Download model weights:
# Download model weights using the diffusers library
from diffusers import StableDiffusionPipeline
import torch

# This downloads the model weights (about 4GB)
model_id = "runwayml/stable-diffusion-v1-5"
pipeline = StableDiffusionPipeline.from_pretrained(
    model_id,
    torch_dtype=torch.float16,
    use_safetensors=True
)
pipeline.save_pretrained("./stable-diffusion-v1-5")
2. Configure your settings:
# Configure memory-efficient settings
pipeline.enable_attention_slicing()  # Reduces VRAM usage
pipeline = pipeline.to("cuda")       # Move model to GPU

# Test with a simple prompt
test_prompt = "A colorful painting of a peaceful garden with flowers"
image = pipeline(test_prompt).images[0]
image.save("test_image.png")
Pro tip: Start with the v1.5 model for general use. It offers excellent quality while requiring less computational power than newer versions.
Generating Images with Stable Diffusion
Now that your environment is set up, let’s explore how to create compelling images with Stable Diffusion.
Understanding the Stable Diffusion Model
To use Stable Diffusion effectively, it helps to understand how the model interprets your prompts:
- The model breaks down your text into tokens and maps them to visual concepts
- It gradually transforms random noise into an image matching your description
- The process involves multiple steps of noise removal and refinement
- The seed value determines the initial noise pattern, affecting the final outcome
This understanding will help you develop more effective prompts and troubleshoot unexpected results.
# Understanding the generation process with visualization
import torch
from diffusers import StableDiffusionPipeline
from PIL import Image
import numpy as np

model_id = "runwayml/stable-diffusion-v1-5"
pipeline = StableDiffusionPipeline.from_pretrained(model_id, torch_dtype=torch.float16)
pipeline = pipeline.to("cuda")

prompt = "A magical forest with glowing mushrooms and a small cottage"

# Set a specific seed for reproducibility
generator = torch.Generator("cuda").manual_seed(42)

# Visualize the denoising process
num_inference_steps = 25
images = []

def visualize_step(step, timestep, latents):
    # Only capture certain steps to see progression
    if step % 5 == 0 or step == num_inference_steps - 1:
        # Convert latents to image
        with torch.no_grad():
            latents_input = 1 / 0.18215 * latents
            image = pipeline.vae.decode(latents_input).sample
            image = (image / 2 + 0.5).clamp(0, 1)
            image = image.cpu().permute(0, 2, 3, 1).numpy()[0]
            image = Image.fromarray((image * 255).astype(np.uint8))
            images.append(image)
            image.save(f"step_{step}.png")

# Generate with callback to visualize steps
result = pipeline(
    prompt,
    num_inference_steps=num_inference_steps,
    generator=generator,
    callback=visualize_step
)

# Final image
final_image = result.images[0]
final_image.save("final_result.png")
Prompt Engineering for Better Results
The quality of your prompts dramatically affects the generated images. Here are key principles for crafting effective prompts:
- Be specific and detailed: “A serene mountain landscape with a crystal-clear lake reflecting the sunset” is better than “mountains and a lake”
- Use artistic terminology: Mention styles, artists, or mediums like “oil painting,” “digital art,” or “in the style of Monet”
- Include composition details: Specify “close-up,” “wide angle,” or “aerial view” to control perspective
- Add quality indicators: Terms like “highly detailed,” “photorealistic,” or “4K” can improve image quality
- Use weights: Emphasize certain elements with (important term:1.2) and de-emphasize with [less important:0.8]
Let’s implement these principles in code:
import torch
from diffusers import StableDiffusionPipeline

pipeline = StableDiffusionPipeline.from_pretrained(
    "runwayml/stable-diffusion-v1-5",
    torch_dtype=torch.float16
).to("cuda")

# Basic prompt
basic_prompt = "mountain lake"
basic_image = pipeline(basic_prompt).images[0]
basic_image.save("basic_prompt.png")

# Detailed prompt with style, composition, and quality indicators
detailed_prompt = """
A serene mountain landscape with a crystal-clear lake reflecting the sunset,
majestic pine trees in the foreground, snow-capped peaks in the background,
photorealistic, 4K, highly detailed, professional photography, golden hour lighting
"""
detailed_image = pipeline(detailed_prompt).images[0]
detailed_image.save("detailed_prompt.png")

# Using weights for emphasis
weighted_prompt = """
A mountain landscape with a (crystal-clear lake:1.3) reflecting the sunset,
(majestic pine trees:1.2) in the foreground, [people:-0.5], 4K, detailed
"""
weighted_image = pipeline(
    weighted_prompt,
    guidance_scale=7.5  # Controls how strictly the image follows the prompt
).images[0]
weighted_image.save("weighted_prompt.png")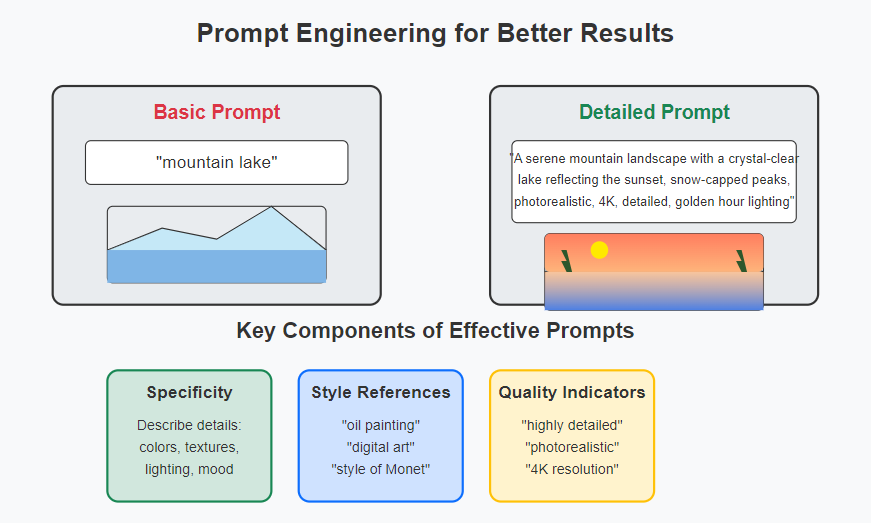
Generating Images Using Stable Diffusion
Now, let’s put everything together to generate images with precise control:
import torch
from diffusers import StableDiffusionPipeline
import random

pipeline = StableDiffusionPipeline.from_pretrained(
    "runwayml/stable-diffusion-v1-5",
    torch_dtype=torch.float16
).to("cuda")

# Function to generate images with consistent parameters
def generate_image(
    prompt,
    negative_prompt="",
    seed=None,
    width=512,
    height=512,
    guidance_scale=7.5,
    num_inference_steps=30,
    filename="output.png"
):
    if seed is None:
        seed = random.randint(1, 999999)

    generator = torch.Generator("cuda").manual_seed(seed)

    image = pipeline(
        prompt=prompt,
        negative_prompt=negative_prompt,
        width=width,
        height=height,
        guidance_scale=guidance_scale,
        num_inference_steps=num_inference_steps,
        generator=generator
    ).images[0]

    image.save(filename)

    print(f"Generated image with seed: {seed}")
    return image, seed

# Example usage
prompt = """
An enchanted forest at twilight, ancient oak trees with glowing lanterns,
magical mist floating above a winding path, detailed digital art,
fantasy concept art, vibrant colors, cinematic lighting
"""

negative_prompt = "blurry, low quality, distorted, deformed, ugly, poor composition"

image, seed = generate_image(
    prompt=prompt,
    negative_prompt=negative_prompt,
    width=768,
    height=512,
    filename="enchanted_forest.png"
)

# Use the same seed to create a variation with different parameters
variant, _ = generate_image(
    prompt=prompt + ", winter scene, snow covered",
    negative_prompt=negative_prompt,
    seed=seed,
    width=768,
    height=512,
    filename="enchanted_forest_winter.png"
)
This approach gives you consistent control over your generations while allowing for creative exploration.
Advanced Techniques with Stable Diffusion
Once you’ve mastered the basics, these advanced techniques will elevate your image generation capabilities.
Controlling the Image Generation Process
Fine-tune your images by controlling key generation parameters:
- Guidance scale: Controls how closely the image adheres to your prompt
- Number of steps: Affects detail level and generation time
- Schedulers: Different sampling methods affecting speed and quality
- Seed values: Allow reproducibility and targeted variations
import torch
from diffusers import StableDiffusionPipeline, DDIMScheduler, LMSDiscreteScheduler, EulerDiscreteScheduler

model_id = "runwayml/stable-diffusion-v1-5"
prompt = "A cyberpunk cityscape at night with neon lights and flying cars"

# Experiment with different schedulers
schedulers = {
    "DDIM": DDIMScheduler.from_pretrained(model_id, subfolder="scheduler"),
    "LMS": LMSDiscreteScheduler.from_pretrained(model_id, subfolder="scheduler"),
    "Euler": EulerDiscreteScheduler.from_pretrained(model_id, subfolder="scheduler")
}

# Try different guidance scales
guidance_scales = [1.0, 7.5, 15.0]

for scheduler_name, scheduler in schedulers.items():
    pipeline = StableDiffusionPipeline.from_pretrained(
        model_id,
        scheduler=scheduler,
        torch_dtype=torch.float16
    ).to("cuda")

    for guidance_scale in guidance_scales:
        # Use same seed for fair comparison
        generator = torch.Generator("cuda").manual_seed(1234)

        image = pipeline(
            prompt=prompt,
            guidance_scale=guidance_scale,
            num_inference_steps=30,
            generator=generator
        ).images[0]

        image.save(f"cityscape_{scheduler_name}_guidance_{guidance_scale}.png")
        print(f"Generated image with {scheduler_name} scheduler and guidance scale {guidance_scale}")
Inpainting and Outpainting
Extend existing images or selectively modify parts of your generated content:
- Inpainting: Replace specific areas of an image while preserving context
- Outpainting: Extend an image beyond its original boundaries
import torch
from diffusers import StableDiffusionInpaintPipeline
from PIL import Image, ImageDraw

# Load the inpainting model
inpaint_model_id = "runwayml/stable-diffusion-inpainting"
inpaint_pipeline = StableDiffusionInpaintPipeline.from_pretrained(
    inpaint_model_id,
    torch_dtype=torch.float16
).to("cuda")

# Create or load an initial image (512x512)
init_image = Image.open("initial_image.png").resize((512, 512))

# Create a mask (white = areas to inpaint, black = areas to keep)
mask = Image.new("RGB", (512, 512), "black")
draw = ImageDraw.Draw(mask)
# Draw a circle in the center to replace
draw.ellipse((156, 156, 356, 356), fill="white")

# Convert to proper format
mask = mask.convert("L")

# Inpaint the image
prompt = "A golden treasure chest with glowing magical items inside"
inpainted_image = inpaint_pipeline(
    prompt=prompt,
    image=init_image,
    mask_image=mask,
    guidance_scale=7.5,
    num_inference_steps=30
).images[0]

inpainted_image.save("inpainted_result.png")

# Simple outpainting by creating an extended canvas and inpainting the new area
def outpaint_right(image, width_to_add, prompt):
    # Create extended canvas
    old_width, height = image.size
    new_width = old_width + width_to_add
    extended = Image.new("RGB", (new_width, height), (0, 0, 0))
    extended.paste(image, (0, 0))

    # Create mask (white = area to outpaint)
    mask = Image.new("L", (new_width, height), "black")
    draw = ImageDraw.Draw(mask)
    draw.rectangle((old_width, 0, new_width, height), fill="white")

    # Outpaint (which is just inpainting on the extended area)
    outpainted = inpaint_pipeline(
        prompt=prompt,
        image=extended,
        mask_image=mask,
        guidance_scale=7.5,
        num_inference_steps=30
    ).images[0]

    return outpainted

extended_image = outpaint_right(
    init_image,
    256,
    "Continue the scene with more magical items and glowing artifacts"
)
extended_image.save("outpainted_result.png")
Incorporating Custom Datasets
Take your generations to the next level by training Stable Diffusion on your own images:
# Note: This is a simplified example of Textual Inversion, which requires less resources than full fine-tuning
import torch
from diffusers import StableDiffusionPipeline
from diffusers.loaders import TextualInversionLoaderMixin
from huggingface_hub import hf_hub_download

# First, download a pre-trained textual inversion embedding as an example
# In practice, you would train your own embedding on your custom images
embedding_url = "sd-concepts-library/cat-toy"
local_path = hf_hub_download(repo_id=embedding_url, filename="learned_embeds.bin")

# Load the model
pipeline = StableDiffusionPipeline.from_pretrained(
    "runwayml/stable-diffusion-v1-5",
    torch_dtype=torch.float16
).to("cuda")

# Load the custom embedding
pipeline.load_textual_inversion(local_path)

# Use the custom concept in a prompt
custom_prompt = "A photo of a <cat-toy> in a fantasy landscape"
custom_image = pipeline(custom_prompt).images[0]
custom_image.save("custom_concept.png")

# To train your own textual inversion (simplified pseudocode)
"""
from diffusers import TextualInversionPipeline

# 1. Prepare 3-5 images of your concept
# 2. Run training (would typically be done in a script)
textual_inversion = TextualInversionPipeline.from_pretrained(
    "runwayml/stable-diffusion-v1-5",
    torch_dtype=torch.float16
)

# Train on your images (placeholder - actual code would be more complex)
textual_inversion.train(
    placeholder_token="<my-concept>",
    initializer_token="object",
    train_data_dir="./my_concept_images/",
    learnable_property="object",
    output_dir="./my_trained_concept"
)

# 3. Use your trained concept
pipeline.load_textual_inversion("./my_trained_concept/learned_embeds.bin")
pipeline("A photo of a <my-concept> on a beach").images[0].save("my_concept_beach.png")
"""
Optimizing Stable Diffusion for Performance
Make your image generation faster and more efficient with these optimization techniques.
Leveraging GPU Acceleration
Properly configuring your GPU settings can significantly improve performance:
import torch
from diffusers import StableDiffusionPipeline
import gc

# Basic memory management and optimization
def optimize_gpu_memory():
    # Clear CUDA cache
    torch.cuda.empty_cache()
    # Garbage collect
    gc.collect()

# Load model with optimizations
pipeline = StableDiffusionPipeline.from_pretrained(
    "runwayml/stable-diffusion-v1-5",
    torch_dtype=torch.float16,  # Use half precision
    revision="fp16"            # Use fp16 revision
).to("cuda")

# Enable memory-efficient attention
pipeline.enable_attention_slicing()

# Optional: Enable VAE slicing if working with large images
pipeline.enable_vae_slicing()

# Generate image with optimized settings
prompt = "A beautiful landscape in the style of Thomas Kinkade"
optimize_gpu_memory()  # Clear memory before generation
image = pipeline(
    prompt=prompt,
    num_inference_steps=25,  # Reduced steps
    height=512,
    width=512
).images[0]

image.save("optimized_generation.png")
Techniques for Faster Image Generation
Speed up your workflow with these practical approaches:
import torch
from diffusers import StableDiffusionPipeline, EulerAncestralDiscreteScheduler
import time

# 1. Use faster schedulers
pipeline = StableDiffusionPipeline.from_pretrained(
    "runwayml/stable-diffusion-v1-5",
    torch_dtype=torch.float16
)
# Euler Ancestral is one of the fastest schedulers
pipeline.scheduler = EulerAncestralDiscreteScheduler.from_config(pipeline.scheduler.config)
pipeline = pipeline.to("cuda")

# 2. Benchmark different settings
prompt = "A cyberpunk city street with neon signs"
results = []

for steps in [10, 20, 30]:
    start_time = time.time()

    image = pipeline(
        prompt=prompt,
        num_inference_steps=steps,
        guidance_scale=7.0
    ).images[0]

    end_time = time.time()
    duration = end_time - start_time

    image.save(f"benchmark_steps_{steps}.png")
    results.append({
        "steps": steps,
        "time": duration,
        "image_path": f"benchmark_steps_{steps}.png"
    })
    print(f"Generated with {steps} steps in {duration:.2f} seconds")

# 3. Use batch processing for multiple images
prompt_batch = [
    "A futuristic cityscape at sunset",
    "A serene forest with a waterfall",
    "A cosmic nebula with stars and planets"
]

start_time = time.time()
batch_images = pipeline(
    prompt=prompt_batch,
    num_inference_steps=20
).images
end_time = time.time()

for i, image in enumerate(batch_images):
    image.save(f"batch_image_{i}.png")

print(f"Generated {len(batch_images)} images in batch in {end_time - start_time:.2f} seconds")
Deployment Considerations
Planning to deploy Stable Diffusion in a production environment? Consider these key factors:
# Example workflow for a simple Stable Diffusion API using FastAPI
from fastapi import FastAPI, BackgroundTasks
import torch
from diffusers import StableDiffusionPipeline
import uuid
import os
import time

app = FastAPI()

# Global variables
MODEL_ID = "runwayml/stable-diffusion-v1-5"
OUTPUT_DIR = "generated_images"
os.makedirs(OUTPUT_DIR, exist_ok=True)

# Initialize model during startup to avoid loading for each request
@app.on_event("startup")
async def startup_event():
    global pipeline
    pipeline = StableDiffusionPipeline.from_pretrained(
        MODEL_ID,
        torch_dtype=torch.float16
    ).to("cuda")
    pipeline.enable_attention_slicing()

# Function to generate images in the background
def generate_image(prompt, image_id):
    try:
        image = pipeline(prompt=prompt).images[0]
        output_path = os.path.join(OUTPUT_DIR, f"{image_id}.png")
        image.save(output_path)
        return {"status": "success", "image_id": image_id, "path": output_path}
    except Exception as e:
        return {"status": "error", "image_id": image_id, "error": str(e)}

# API endpoint for image generation
@app.post("/generate")
async def create_image(prompt: str, background_tasks: BackgroundTasks):
    image_id = str(uuid.uuid4())
    background_tasks.add_task(generate_image, prompt, image_id)
    return {"status": "processing", "image_id": image_id}

# API endpoint to check generation status
@app.get("/status/{image_id}")
async def check_status(image_id: str):
    output_path = os.path.join(OUTPUT_DIR, f"{image_id}.png")
    if os.path.exists(output_path):
        return {"status": "complete", "image_id": image_id, "url": f"/images/{image_id}.png"}
    else:
        return {"status": "processing", "image_id": image_id}

# To run this example:
# 1. Save as app.py
# 2. Install dependencies: pip install fastapi uvicorn
# 3. Run with: uvicorn app:app --host 0.0.0.0 --port 8000
Key production deployment considerations include:
- Setting up a queue system for handling multiple requests
- Implementing proper error handling and logging
- Monitoring GPU usage and temperature
- Setting up auto-scaling for handling traffic spikes
- Implementing rate limiting to prevent abuse
- Considering content moderation for generated images
Conclusion and Next Steps
Recap of Key Learnings
We’ve covered a comprehensive journey through Stable Diffusion, from basic concepts to advanced techniques:
- Understanding what Stable Diffusion is and how it transforms text into images
- Setting up your environment and installing necessary components
- Crafting effective prompts that yield better results
- Controlling the generation process through various parameters
- Exploring advanced techniques like inpainting and custom training
- Optimizing performance for faster generation
- Considering deployment options for production use
The power of Stable Diffusion lies in its accessibility, versatility, and the creative control it offers. As an open-source tool, it continues to evolve with contributions from a vibrant community of developers and artists.
Potential Future Developments in Stable Diffusion
The field of AI image generation is advancing rapidly. Here are some exciting developments to watch for:
- Higher resolution outputs: Future versions will likely generate larger, more detailed images
- Better consistency: Improved models for maintaining consistent characters and scenes across multiple images
- Video generation: Extensions that create short animations or videos from prompts
- Multi-modal capabilities: Integration with other AI systems for more comprehensive creative tools
- More efficient models: Faster generation with lower computational requirements
- Enhanced control: More precise ways to specify exactly what you want in your images
As these developments unfold, the creative possibilities will continue to expand.
Resources for Further Exploration
Ready to deepen your Stable Diffusion journey? Here are valuable resources to explore:
- Communities:
- Tools and Extensions:
- Learning Resources:
The journey with Stable Diffusion is just beginning. As you experiment and create, you’ll discover your own techniques and preferences. The most important step is to start generating, learn from each result, and let your creativity flow.
Whether you’re an artist looking to enhance your workflow, a developer integrating image generation into applications, or simply a curious creator, Stable Diffusion offers a fascinating gateway into the world of AI-assisted creativity. The question now is: what will you create?
# A final inspiration generator to help you start your journey
import torch
from diffusers import StableDiffusionPipeline
import random

# Load the model one last time
pipeline = StableDiffusionPipeline.from_pretrained(
    "runwayml/stable-diffusion-v1-5",
    torch_dtype=torch.float16
).to("cuda")

# A collection of creative starting points
inspiration_prompts = [
    "A surreal dreamscape with floating islands and impossible architecture",
    "An ancient magical library with books that glow with knowledge",
    "A futuristic cityscape where nature and technology have merged harmoniously",
    "A mystical creature emerging from a portal between dimensions",
    "A steampunk workshop with intricate brass contraptions and gears"
]

# Generate a random inspiration
selected_prompt = random.choice(inspiration_prompts)
print(f"Your inspiration: {selected_prompt}")

# Generate the image
image = pipeline(selected_prompt).images[0]
image.save("your_inspiration.png")

print("Now it's your turn to create something amazing!")
Also Read
- Next Level Object-Detection: Real-Time AI Vision Made Simple – https://vedanganalytics.com/next-level-object-detection-real-time-ai-vision-made-simple/
- DeepSeek AI: Pioneering Innovation and Creativity – https://vedanganalytics.com/deepseek-ai-pioneering-innovation-and-creativity-in-the-ai-world/
- NER Model Mastery: Develop a High-Accuracy AI Model – https://vedanganalytics.com/ner-model-mastery-develop-a-high-accuracy-ai-model-now/
SEO Solution
says:
Yay google is my queen helped me to find this outstanding site! .
คาเฟ่ ครอบครัว ขอนแก่น
says:
I have been absent for a while, but now I remember why I used to love this site. Thank you, I¦ll try and check back more frequently. How frequently you update your site?